
Carmelitas

For the serious caramel lover: soft, chewy oatmeal bars layered with melted caramel and chocolate. One-bowl, no-mixer, irresistible.
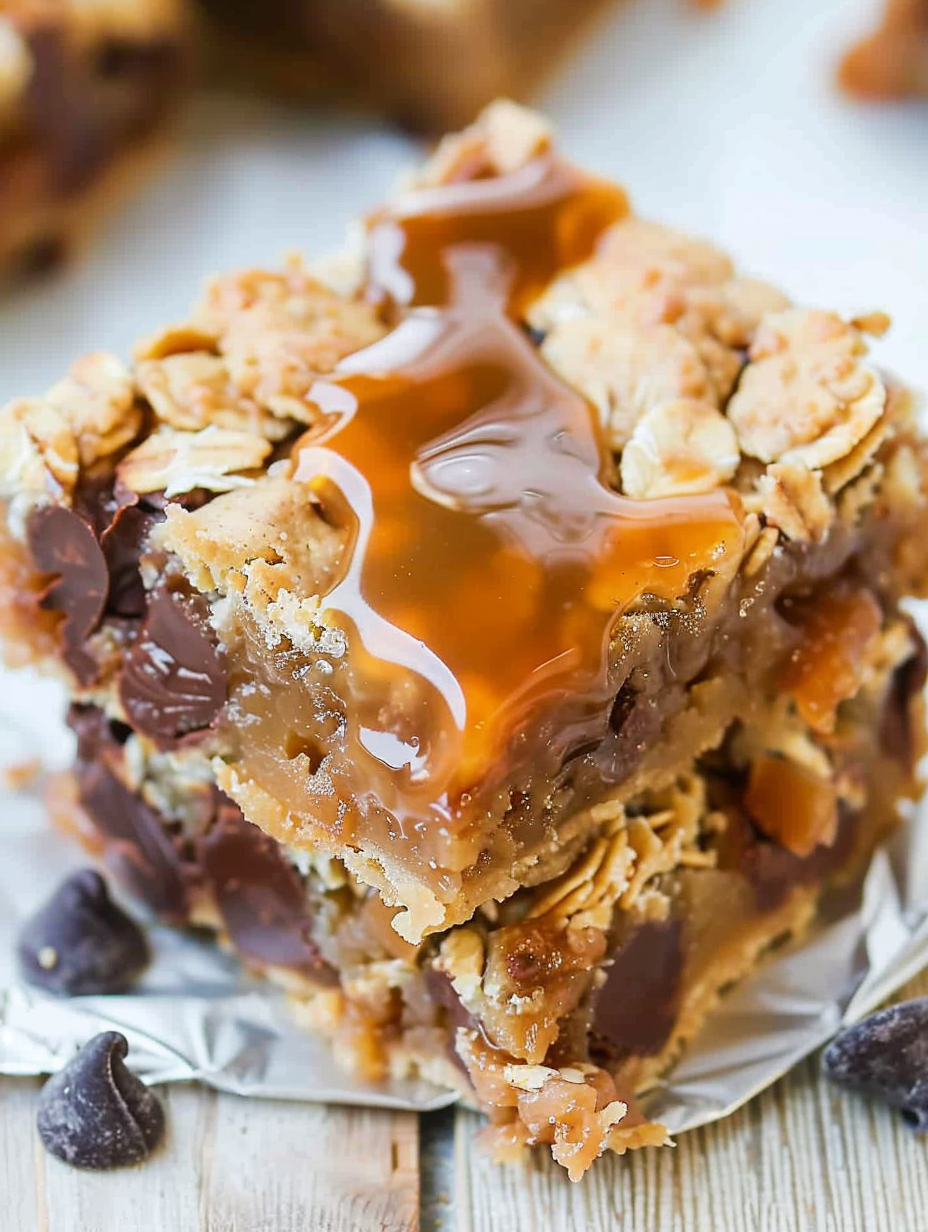
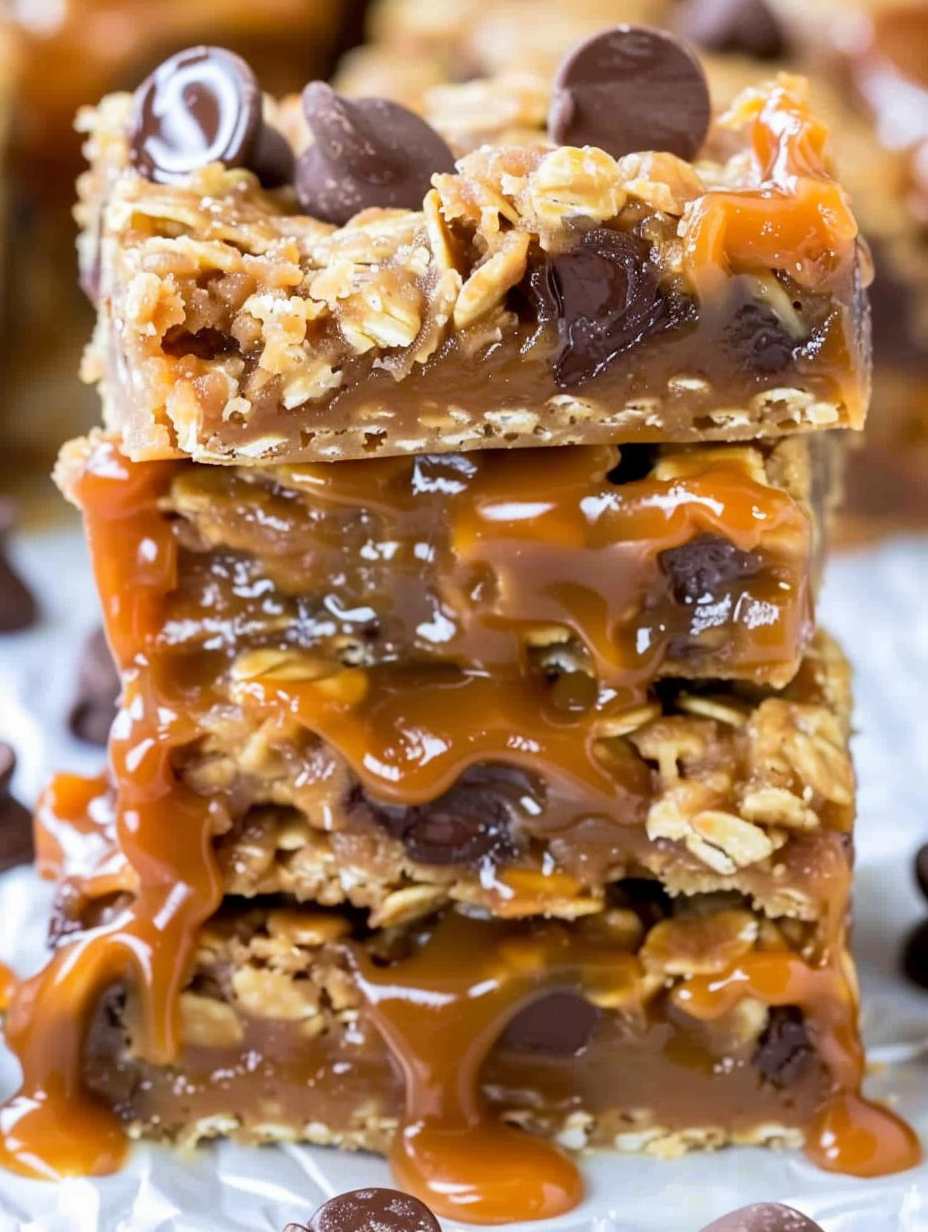
This version of carmelitas is for anyone who believes there is never too much caramel. I first made these on a lazy weekend when I wanted a single-pan treat that would travel well to a potluck. The combination of a buttery oat base, molten caramel, and melty chocolate on top created layers of texture and flavor that my family couldn’t stop talking about. The bars are soft and chewy, with a slightly crisp edge and decadent ribbons of caramel that set into a gooey center—perfect for those who prefer their sweets luxuriously sticky.
I adapted this method from a recipe I love and made it extremely approachable: one bowl, no electric mixer, and simple pantry staples. The trick is in the timing—par-baking the oat base gives structure, and slowly melting the caramels with cream yields a silky sauce that pours and sets perfectly. I often make a double batch for gatherings because these disappear fast; friends have told me these are the best carmelitas they’ve tasted at a bake sale or holiday table.
Why You'll Love This Recipe
- Ready with just one large bowl and no stand mixer, so cleanup is quick and minimal—ideal for busy weeknights or last-minute baking.
- Uses pantry staples like old-fashioned rolled oats and all-purpose flour, plus caramels you can buy in any grocery store; no specialty ingredients needed.
- Made in an 8x8-inch pan for a perfect shallow bake that yields 16 generous bars—great for sharing or gifting.
- Par-baked base prevents sogginess and holds up to the rich caramel layer, giving you distinct chewy and gooey textures in each bite.
- Make-ahead friendly: bars store at room temperature up to a week and freeze well up to four months, making them a practical treat for holidays or care packages.
- Crowd-pleaser: the caramel-chocolate combination satisfies both chocolate lovers and caramel devotees, appealing to a wide range of tastes.
In my kitchen these bars became a holiday staple the first time I made them; the aroma of melting caramel and butter draws everyone in. My nieces nicknamed these 'sticky happiness' and have requested them for every birthday since.
Ingredients
- Butter (3/4 cup, melted / 1 1/2 sticks): Use unsalted butter so you control the salt level; if you only have salted, taste the batter and omit any extra salt. Butter adds richness and moisture to the oat base.
- Light brown sugar (3/4 cup, packed): Brown sugar gives the bars a deeper, molasses-tinged sweetness and helps create a tender chew. Pack firmly for accurate measurement.
- Vanilla extract (1 tablespoon): A good-quality vanilla amplifies caramel and chocolate notes—use pure extract rather than imitation when possible.
- All-purpose flour (1 cup): Provides structure to the oat base; spoon into the cup and level off for accuracy rather than scooping directly from the bag.
- Old-fashioned rolled oats (1 cup): Use whole rolled oats, not quick or instant, to retain chew and texture in the bars. Gluten-free oats work if you need a wheat-free option, but the recipe is not otherwise gluten-free.
- Baking soda (1 teaspoon) and salt (1/2 teaspoon): Baking soda gives a light lift and the pinch of salt balances the sweetness—adjust salt to taste if using salted butter.
- Caramel squares (about 35 unwrapped): I use Werther's Originals Soft Caramels; you'll need roughly two bags. If your caramels are smaller, add a couple more.
- Heavy cream (1/2 cup): Combines with the caramels to make a pourable sauce that sets into a luscious layer—don’t substitute low-fat milk here or the caramel won’t set correctly.
- Semi-sweet chocolate chips or chunks (1 cup): Use quality chocolate; I often mix chips and chopped bars for varied melt and texture.
Instructions
Prepare the pan:Preheat the oven to 350°F. Line an 8x8-inch square pan with aluminum foil, leaving an overhang for easy removal, and spray lightly with cooking spray. Lining is crucial because the caramel layer is sticky and foil makes cleanup and slicing far simpler.Make the oat base:In a large microwave-safe bowl, melt the butter in 60–90 second bursts until just melted. Whisk in brown sugar and vanilla until smooth. Add the flour, rolled oats, baking soda, and salt, stirring until combined; the mixture will be thick. Reserve roughly half the mixture for the topping and press the other half evenly into the prepared pan using a spatula or the back of a spoon. Par-bake this base for 10 minutes to set the structure and prevent soggy layers.Create the caramel sauce:In a large microwave-safe bowl, combine the unwrapped caramel squares, heavy cream, and a pinch of salt. Microwave in 60-second intervals, stirring after each, until the caramels are fully melted and smooth—typically 4–5 minutes total. Alternatively, melt over medium-low in a small saucepan, stirring constantly so the sugar doesn't scorch. The goal is a glossy, pourable sauce.Assemble layers:When the par-baked base comes out of the oven, evenly sprinkle the chocolate chips over the hot crust so they begin to soften. Slowly pour the warm caramel sauce over the chocolate to ensure an even layer. Crumble the reserved oat mixture evenly on top, gently pressing a bit but not compacting completely.Finish baking:Return the pan to the oven and bake for 15–18 minutes until the edges are lightly browned and the center shows a slight bubble. This signals the caramel is set to finish. I often pull mine at 16½ minutes for perfect chewiness.Cool completely before slicing:Allow bars to cool in the pan at room temperature for up to 4 hours, or overnight, to let the caramel firm up. For faster setting, place the pan uncovered in the refrigerator with a sheet of foil loosely over the top to prevent fridge odors. If you cut while warm they will be gooey and messy; wait for clean slices.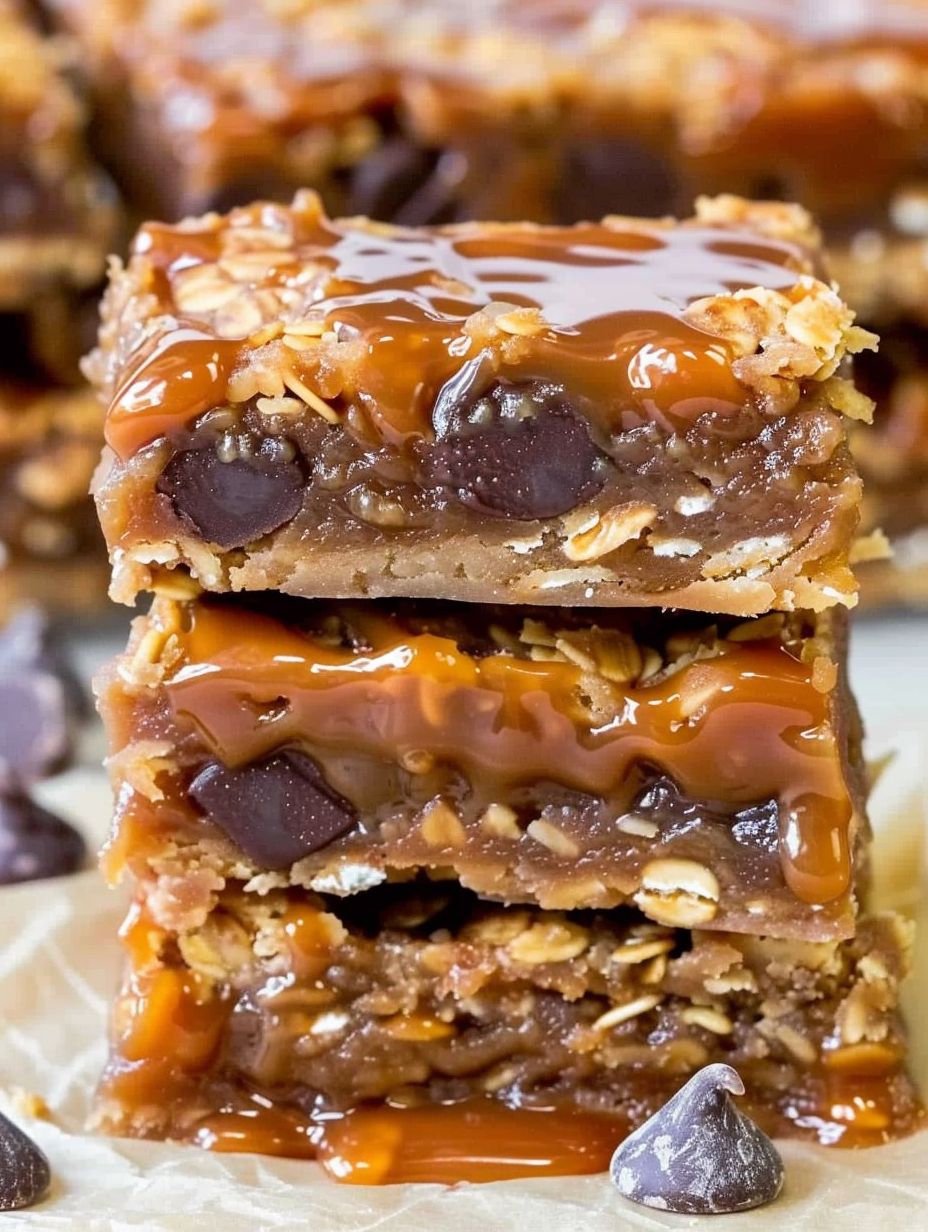
You Must Know
- The bars keep at room temperature in an airtight container for up to 1 week, and freeze well for up to 4 months; thaw at room temperature for neat slicing.
- Use old-fashioned rolled oats—not quick oats—for structure and chew; quick oats will yield a softer, less textured bar.
- If your caramels are individually wrapped in thicker paper, choose soft baking caramels or caramel bits for effortless melting; you may need to add a few extra pieces if they’re small.
- Allow at least 4 hours cooling time at room temperature for the caramel to firm. Refrigeration speeds the process but check for condensation; cover loosely with foil.
My favorite aspect of these bars is the contrast between the nutty oat chew and the silky caramel ribbon. Friends often ask for the recipe because they remember the way the chocolate oozes when you cut into a warm piece. I always advise letting them rest so the caramel can hold its shape—patience yields perfectly sliced squares that are picture-perfect for gifting.
Storage Tips
Store cooled bars in an airtight container layered with parchment to prevent sticking, at room temperature for up to a week. For longer keeping, wrap tightly and freeze for up to four months; individual slices thaw quickly at room temperature. If refrigerating to speed firmness, place a sheet of foil over the pan to shield from fridge odors and remove after 10–15 minutes to avoid condensation. To reheat single portions, warm briefly at 250°F for 5–7 minutes so caramel softens without melting completely.
Ingredient Substitutions
If you need to modify ingredients, swap butter for a high-quality vegan stick margarine to make a dairy-free version, but expect a slight textural difference. For chocolate, use dark or milk depending on sweetness preference. To make gluten-free bars, replace all-purpose flour with a 1:1 gluten-free flour blend and confirm oats are certified gluten-free. For a lighter caramel note, use half the amount of heavy cream and stir more slowly while melting caramels; avoid using evaporated milk, which can alter set and flavor.
Serving Suggestions
Serve squares slightly warm with a scoop of vanilla ice cream or a dollop of whipped cream for contrast. For a party platter, cut into smaller bite-sized pieces and arrange on a parchment-lined tray with a sprinkle of flaky sea salt to balance sweetness. These bars pair beautifully with black coffee or a bold tea; for a grown-up twist, drizzle with a little bourbon-spiked caramel before serving.
Cultural Background
Bars like these trace their roots to American baking traditions of pan-held sweet squares such as blondies and brownies, combining oatmeal’s humble grain with confectionery caramel to make a decadent hybrid. Oatmeal-based bars became popular in home baking because they were economical and portable; adding caramel and chocolate elevated the simple oat bar into something indulgent reserved for special occasions. Regional variations include adding nuts or coconut, while commercial versions inspired many home cooks to make their own from scratch.
Seasonal Adaptations
In autumn, fold in a teaspoon of ground cinnamon and a pinch of nutmeg to the oat base for cozy spice notes. For winter holidays, sprinkle chopped toasted pecans on top before the final bake or add a drizzle of white chocolate for visual contrast. In spring, lighten the presentation with citrus-zested caramel (add a teaspoon of orange zest to the sauce) for a bright finish. Small tweaks change the mood of these bars to match every season.
Meal Prep Tips
To prep ahead, bake the bars and store them wrapped in foil in the refrigerator for up to five days—this makes slicing neater. For grab-and-go breakfasts or snacks, cut into portion-sized squares and freeze individually on a tray before transferring to a freezer bag. Label with date and enjoy within four months; reheat briefly or enjoy at room temperature. Making a double batch and freezing half saves time and ensures you always have a sweet treat on hand.
These carmelitas balance convenience and decadence: easy enough for weeknight baking yet special enough for gifting. Give them a try at your next gathering and tweak them to suit your taste—the foundational method is forgiving and endlessly adaptable.
Pro Tips
Press the bottom layer evenly and par-bake it for 10 minutes so the crust holds up under the caramel.
Melt caramels slowly in 60-second bursts and stir between intervals to avoid scorching; a glossy sauce indicates readiness.
Allow the bars to cool completely, preferably 4 hours or overnight, for the caramel to firm for clean slicing.
Use old-fashioned rolled oats for chew; quick oats will produce a much softer, less textured result.
This nourishing carmelitas recipe is sure to be a staple in your kitchen. Enjoy every moist, high protein slice — it is perfect for breakfast or as a wholesome snack any time.
Tags
Carmelitas
This Carmelitas recipe makes perfectly juicy, tender, and flavorful steak every time! Serve with potatoes and a side salad for an unforgettable dinner in under 30 minutes.
Ingredients
Base
Caramel Layer
Topping
Instructions
Prepare pan
Preheat oven to 350°F. Line an 8x8-inch pan with aluminum foil leaving an overhang, and spray lightly with cooking spray. Set aside.
Make the oat base
In a large microwave-safe bowl, melt the butter (about 60–90 seconds). Whisk in brown sugar and vanilla until smooth. Stir in flour, rolled oats, baking soda, and salt until combined; mixture will be thick. Reserve half for topping, press remaining half evenly into the prepared pan, and bake for 10 minutes to set.
Melt caramels
Combine unwrapped caramels, heavy cream, and a pinch of salt in a microwave-safe bowl. Heat in 60-second bursts, stirring between each, until smooth and pourable (about 4–5 minutes), or melt gently in a saucepan over medium-low while stirring constantly.
Assemble and top
Sprinkle chocolate chips evenly over the hot par-baked base. Slowly pour the caramel sauce over the chocolate, then evenly crumble the reserved oat mixture on top; gently press slightly to adhere.
Final bake
Return the pan to the oven and bake 15–18 minutes until edges are lightly browned and center bubbles slightly. Remove from oven and cool at room temperature for up to 4 hours or overnight to let caramel firm.
Slice and serve
Use the foil overhang to lift bars from the pan. Slice into 16 squares once fully cooled. For faster setting, refrigerate briefly but be mindful of condensation when reheating or serving.
Last Step: Please leave a rating and comment letting us know how you liked this recipe! This helps our business to thrive and continue providing free, high-quality recipes for you.
Nutrition
Did You Make This?
Leave a comment & rating below or tag
@velvetyum on social media!
Categories:
You might also like...

Cheesy Zucchini Rollatini
Tender grilled zucchini rolled with a basil-kissed ricotta filling, nestled in marinara, and baked until the mozzarella bubbles and turns golden.

Crispy Zucchini and Squash
Golden, garlicky rounds with a deep-fried crunch made lighter in the air fryer. A fast, vitamin-packed side everyone devours.

Chicken Parmesan Meatballs
Tender chicken meatballs simmered in marinara, finished with melted mozzarella and basil for cozy, weeknight Italian comfort in every bite.
Did You Make This?
Leave a comment & rating below or tag @velvetyum on social media!
Rate This Recipe
Share This Recipe
Enjoyed this recipe? Share it with friends and family, and don't forget to leave a review!
Comments (1)
This recipe looks amazing! Can't wait to try it.
Comments are stored locally in your browser. Server comments are displayed alongside your local comments.

Hi, I'm Emma!
What's Popular

30-Minute Meals!
Join to receive our email series which contains a round-up of some of our quick and easy family favorite recipes.