
Chocolate Chip Cherry Bars

A beloved blondie-style bar studded with fresh cherries and semi-sweet chips — tender, slightly chewy, and reliably perfect every time.
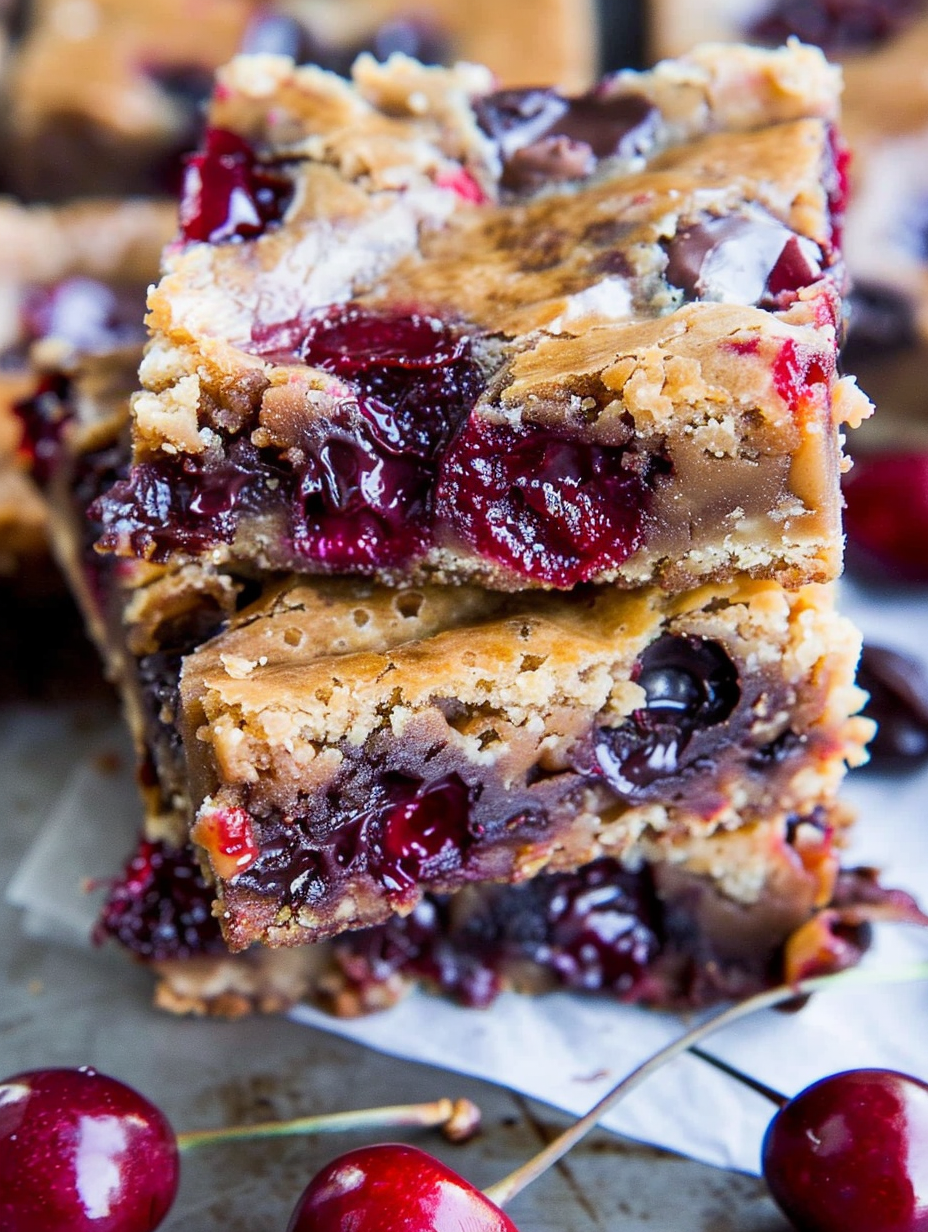
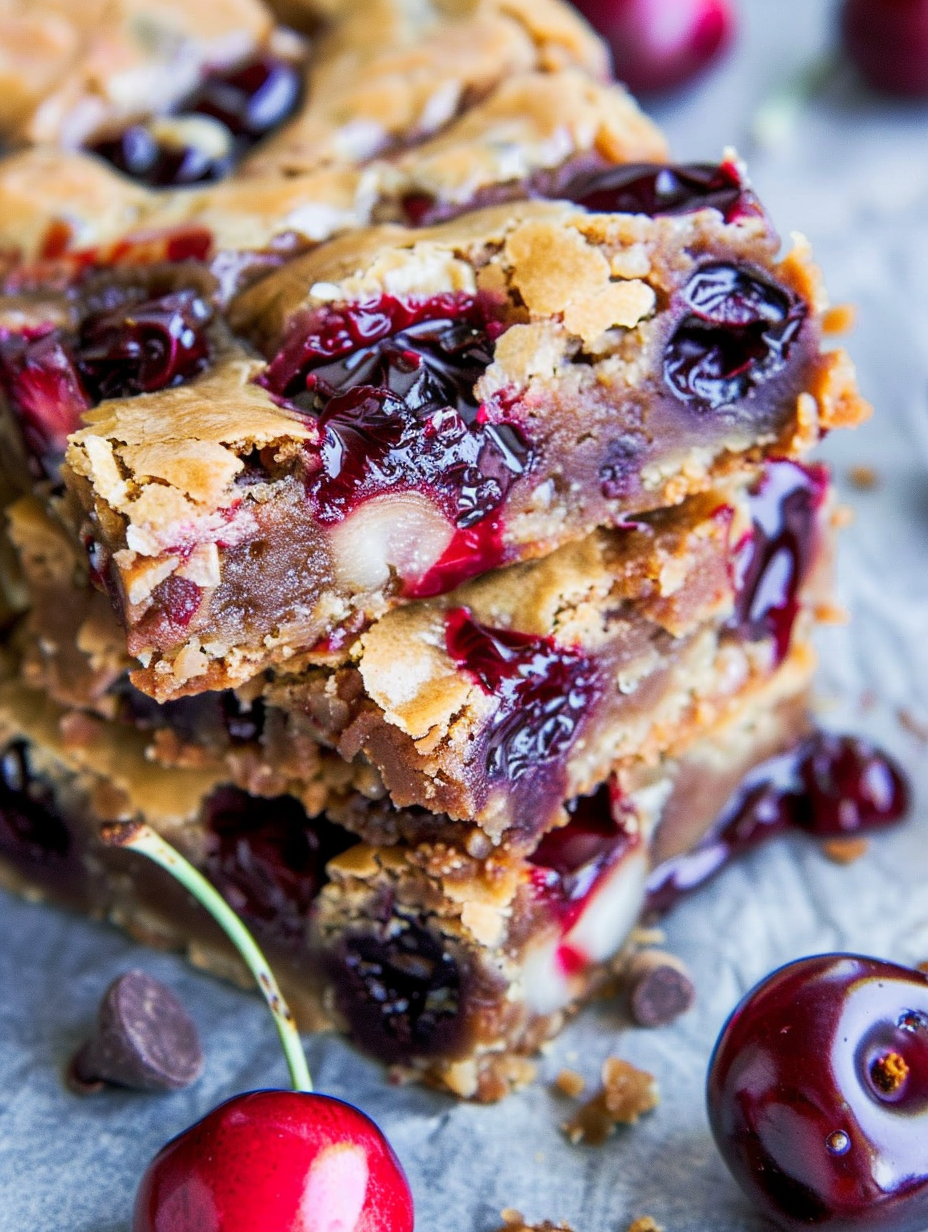
This recipe for Chocolate Chip Cherry Bars has been one of my happiest kitchen discoveries — a simple blondie base that turns into something unexpectedly bright and joyful when studded with cherries. I first developed this combination on an ordinary afternoon when a bag of cherries and a craving for something sweet collided. The result was so good that it joined my rotation immediately: tender edges, a chewy center, pockets of warm chocolate, and bursts of tart-sweet cherries that lift the whole bar. It’s the kind of dessert that disappears fast at gatherings and gets requests for the recipe long after the last bite.
I love these bars because they feel both homey and a little special. The base is essentially a buttery blondie — rich with brown sugar and vanilla — but the cherries add freshness and a pleasant juiciness that contrasts beautifully with the chocolate. They work with fresh summer cherries or frozen ones in the off-season, and they’re forgiving enough that you can mix and match fruit as you like. Over the years I’ve adjusted the bake time and fruit quantity to get consistent results: the edges pull away slightly when done, and the center should be set but still tender.
Why You'll Love This Recipe
- Reliable texture every time: the simple blondie base yields tender edges and a chewy center without fuss, ready in about 1 hour from start to finish.
- Uses common pantry staples — butter, brown sugar, flour, egg — plus one cup of cherries, so you can often make it without a special grocery run.
- Flexible fruit options: fresh or frozen cherries work, and you can swap in berries or stone fruit if cherries aren’t available.
- Perfect for gatherings: makes nine generous bars that travel well and can be made ahead and stored at room temperature for days.
- Kid-friendly and crowd-pleasing: chocolate chips add comfort factor while the cherries keep the flavor bright and complex.
- Quick prep: active work time is only about 10 minutes, which makes this an easy last-minute baking win.
I’ve watched these bars become a favorite at potlucks and family dinners. One summer I brought a pan to a neighborhood picnic and neighbors came back twice for seconds — the cherries made people nostalgic and the chocolate kept kids begging for more. I also love how forgiving this batter is: a few extra folds or a slightly longer bake rarely ruins the outcome, which makes it an ideal recipe to teach novice bakers.
Ingredients
- Unsalted butter (1/2 cup / 1 stick): Melted butter gives the base its rich flavor and tender crumb. Use good-quality butter such as Plugrá or Land O Lakes for a clean, creamy taste.
- Light brown sugar (1 cup, packed): Provides moisture and caramel notes that define a blondie. Pack the cup firmly for consistent sweetness and texture.
- Large egg (1): Adds structure and helps the bars set. Use a large egg at room temperature for best incorporation.
- Vanilla extract (2 teaspoons): A high-quality pure vanilla extract enhances the caramel and fruit flavors. Nielsen-Massey is a reliable brand.
- All-purpose flour (1 cup): Gives body without weighing the bars down. Measure by spooning into the cup and leveling for accuracy; King Arthur works well here.
- Salt (1/4 teaspoon, optional): A pinch brightens flavors; omit only if you’re using salted butter and prefer to skip.
- Semi-sweet chocolate chips (3/4 to 1 cup): Ghirardelli or Guittard chips hold their shape but soften deliciously, creating melty pockets throughout the bars.
- Cherries (1 cup, fresh or frozen): I prefer whole cherries for big bursts of flavor, but halving them works if you want smaller pieces. Fresh sweet cherries or pitted frozen cherries are both fine.
Instructions
Preheat and prepare: Preheat the oven to 350°F. Line an 8-by-8-inch baking pan with aluminum foil or parchment paper, leaving an overhang for easy lifting, and spray lightly with cooking spray. The foil makes it easy to remove bars from the pan without crumbling. Melt the butter: In a medium microwave-safe bowl, melt 1/2 cup (1 stick) butter for about 60 seconds, stirring halfway through to avoid hot spots. Warm butter blends smoothly with sugar, ensuring a silky batter. Combine sugar and butter: To the melted butter add 1 cup packed light brown sugar and stir until glossy and combined. This step dissolves some of the sugar and creates the base’s characteristic chew. Add egg and vanilla: Whisk in 1 large room-temperature egg and 2 teaspoons vanilla extract until incorporated. The egg emulsifies the mixture and builds the framework the flour will strengthen. Fold in dry ingredients: Add 1 cup all-purpose flour and 1/4 teaspoon salt (if using). Stir gently until just combined; over-mixing develops gluten and can make the bars tough. A few streaks of flour are okay — they’ll disappear with gentle folding. Add chocolate and cherries, then bake: Fold in 3/4 to 1 cup semi-sweet chocolate chips and 1 cup cherries (fresh or frozen). Pour the batter into the prepared pan and smooth the top with an offset spatula. Bake 27 to 32 minutes, until the edges begin to pull away and the center is set but still tender — remember the cherries and chips may make a toothpick come out with moist crumbs. Cool and slice: Allow the bars to cool completely in the pan for at least 1 hour to fully set. Use the foil overhang to lift the slab from the pan and slice into nine bars with a sharp knife, wiping the blade between cuts for clean edges.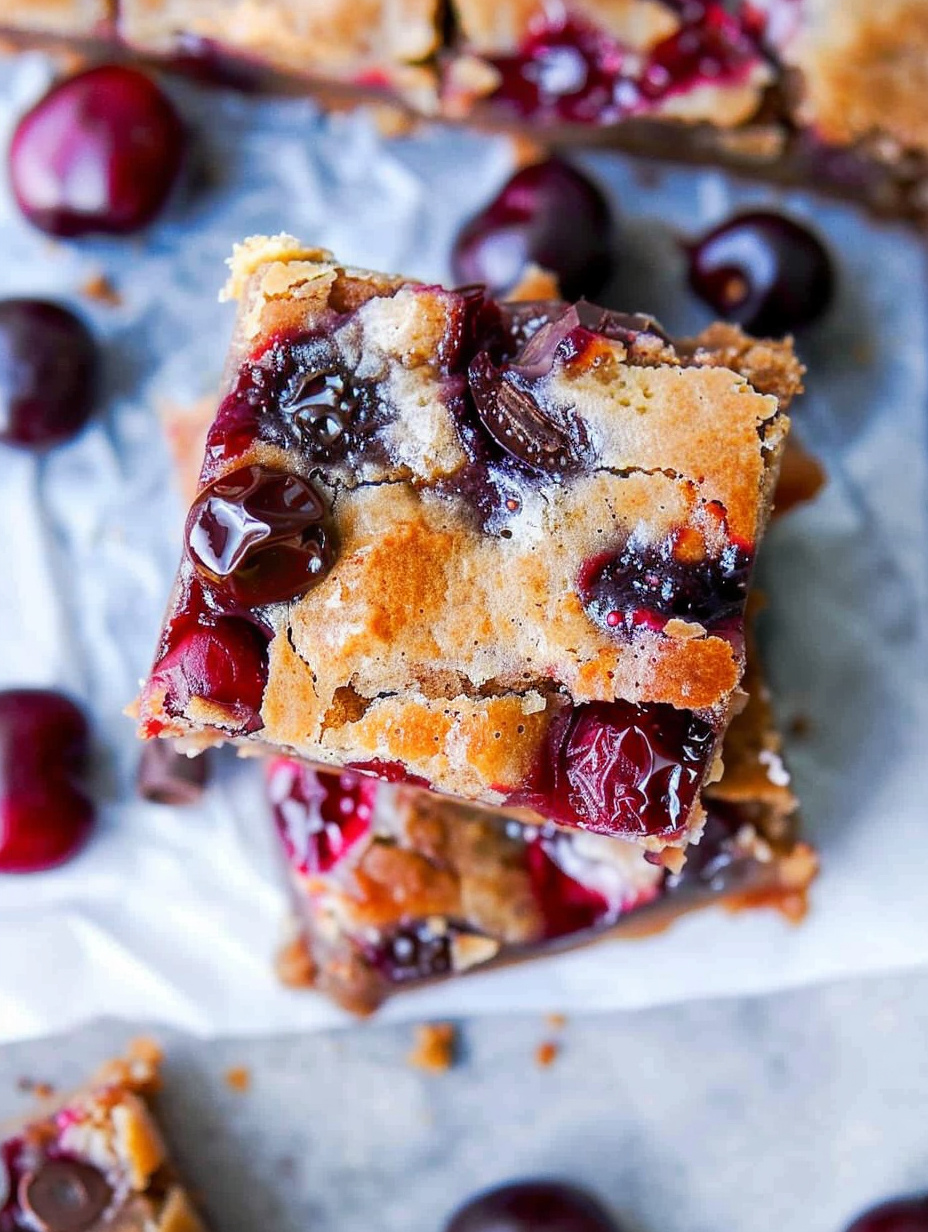
You Must Know
- These bars freeze very well for up to 3 months. Wrap individually in plastic then place in a freezer bag to maintain texture.
- Cooling time is critical: at least 1 hour at room temperature yields clean slices. Warm bars are delicious but may be gummy when cut.
- Fruit moisture affects bake time. Juicier fruits or thawed frozen cherries may increase baking time slightly to reach a set center.
- Calories and macros: about 309 calories per serving with roughly 43 g carbs, 15 g fat, and 3 g protein — treat-sized but satisfying.
My favorite thing about this combination is the contrast: buttery, caramel-like blondie and the bright pop of cherries. Family members often comment on the fruitiness; it makes a dessert that feels seasonal even when made with frozen fruit. Over the years I’ve learned to trust visual cues — edges pulling away and a slightly soft center — more than a strict toothpick test because of the fruit and chocolate.
Storage Tips
Store cooled bars in an airtight container at room temperature for up to one week. If your kitchen is warm, refrigerate to preserve texture; bring to room temperature before serving for the best mouthfeel. For longer storage, freeze bars (whole slab or individually wrapped) for up to three months. Thaw in the refrigerator overnight or at room temperature for a few hours, then warm briefly in a low oven (275°F for 8–10 minutes) if you want the chocolate slightly melty.
Ingredient Substitutions
If you need to swap ingredients, use 1/2 cup melted coconut oil in place of butter for a dairy-free option (note: flavor will change). Replace the all-purpose flour with a 1:1 gluten-free flour blend, but add 1/4 teaspoon xanthan gum if your blend lacks it to help with structure. For less sugar, reduce brown sugar to 3/4 cup — bars will be a touch firmer. Swap semi-sweet chips for dark or milk chocolate depending on sweetness preference. Fruit substitutions: use an equal volume of berries or chopped stone fruit; frozen fruit is fine but pat dry if it’s very wet.
Serving Suggestions
Serve bars slightly warm with a scoop of vanilla ice cream for an indulgent dessert, or dust with powdered sugar for a pretty presentation at brunch. They pair nicely with strong coffee or a light sparkling wine if you’re serving them at a celebration. For a portable snack, wrap individually and tuck into lunchboxes — they hold up well and make a satisfying treat.
Cultural Background
Blondie-style bars trace their lineage to classic American baking traditions — a riff on brownies that replaces cocoa with brown sugar and vanilla for a toffee-like flavor. Adding fruit such as cherries nods to the longtime American practice of mixing fresh seasonal produce into batter to create rustic, homey desserts. These bars sit comfortably within that tradition: simple, unfussy, and meant to be shared.
Seasonal Adaptations
Summer is prime time for fresh cherries, but in winter I use frozen, patted dry, or switch to preserved cherries packed in light syrup (drained) and reduce bake time slightly. In autumn try chopped plums or firm peaches. Around the holidays, fold in 1/2 cup chopped dried cherries and a teaspoon of cinnamon for a festive spin. The basic method adapts easily to seasonal fruit without losing its dependable texture.
Meal Prep Tips
Make the slab ahead and slice the day you plan to serve for the cleanest edges. For grab-and-go breakfasts or snacks, slice and wrap bars individually, then refrigerate or freeze. If you’re prepping for a party, bake two pans and store one in the freezer; thaw it the day of and warm briefly to refresh. Keep a small container of extra chocolate chips and fresh cherries nearby to quickly garnish warm bars before serving for a bakery-style presentation.
These Chocolate Chip Cherry Bars have become a regular request at my table because they’re easy, flexible, and reliably delicious. Give them a try with your favorite cherries and enjoy how a few simple ingredients can transform into something special to share.
Pro Tips
Use room-temperature egg for better emulsification and a smoother batter.
If using frozen cherries, drain and pat dry to avoid extra moisture in the batter.
Allow bars to cool completely before slicing to get clean edges and neat portions.
For extra flavor, toast the chocolate chips briefly in the oven before folding them into the batter.
This nourishing chocolate chip cherry bars recipe is sure to be a staple in your kitchen. Enjoy every moist, high protein slice — it is perfect for breakfast or as a wholesome snack any time.
Tags
Chocolate Chip Cherry Bars
This Chocolate Chip Cherry Bars recipe makes perfectly juicy, tender, and flavorful steak every time! Serve with potatoes and a side salad for an unforgettable dinner in under 30 minutes.
Instructions
Preheat and prepare pan
Preheat oven to 350°F. Line an 8-by-8-inch pan with aluminum foil, leaving an overhang, and spray with cooking spray.
Melt butter
In a medium microwave-safe bowl, melt 1/2 cup (1 stick) butter about 60 seconds, stirring halfway through to prevent hot spots.
Combine sugar and butter
Add 1 cup packed light brown sugar to the melted butter and stir until glossy and combined to form the base.
Add egg and vanilla
Whisk in 1 large room-temperature egg and 2 teaspoons vanilla extract until incorporated and smooth.
Fold in dry ingredients
Add 1 cup all-purpose flour and 1/4 teaspoon salt (optional). Stir gently until just combined, avoiding over-mixing.
Add chips and cherries; bake
Fold in 3/4 to 1 cup semi-sweet chocolate chips and 1 cup cherries. Pour batter into prepared pan and bake 27 to 32 minutes until edges pull away and center is set.
Cool and slice
Cool in the pan at least 1 hour. Use foil overhang to lift out and slice into nine bars with a sharp knife.
Last Step: Please leave a rating and comment letting us know how you liked this recipe! This helps our business to thrive and continue providing free, high-quality recipes for you.
Nutrition
Did You Make This?
Leave a comment & rating below or tag
@velvetyum on social media!
Categories:
You might also like...

Cheesy Zucchini Rollatini
Tender grilled zucchini rolled with a basil-kissed ricotta filling, nestled in marinara, and baked until the mozzarella bubbles and turns golden.

Crispy Zucchini and Squash
Golden, garlicky rounds with a deep-fried crunch made lighter in the air fryer. A fast, vitamin-packed side everyone devours.

Chicken Parmesan Meatballs
Tender chicken meatballs simmered in marinara, finished with melted mozzarella and basil for cozy, weeknight Italian comfort in every bite.
Did You Make This?
Leave a comment & rating below or tag @velvetyum on social media!
Rate This Recipe
Share This Recipe
Enjoyed this recipe? Share it with friends and family, and don't forget to leave a review!
Comments (1)
This recipe looks amazing! Can't wait to try it.
Comments are stored locally in your browser. Server comments are displayed alongside your local comments.

Hi, I'm Emma!
What's Popular

30-Minute Meals!
Join to receive our email series which contains a round-up of some of our quick and easy family favorite recipes.