
>>

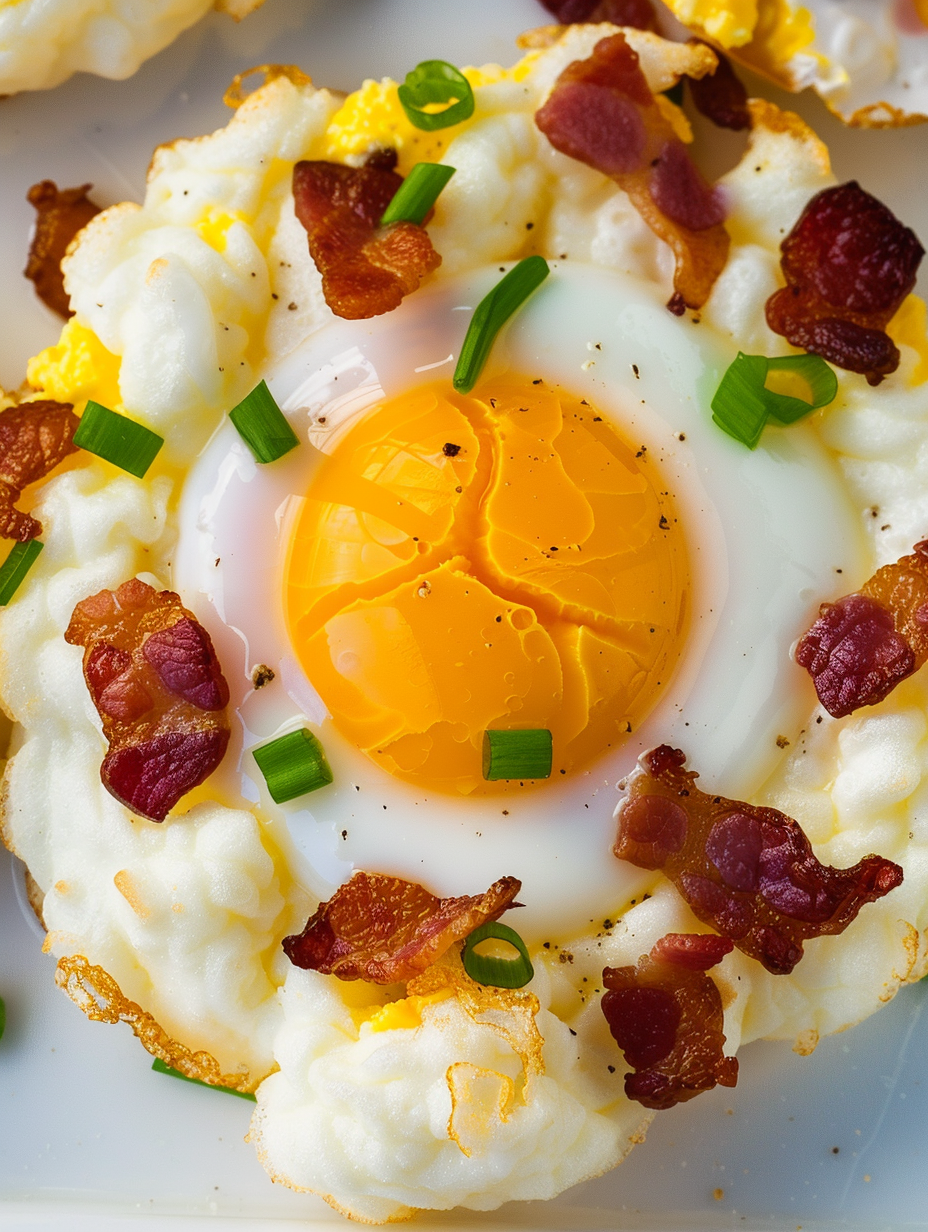
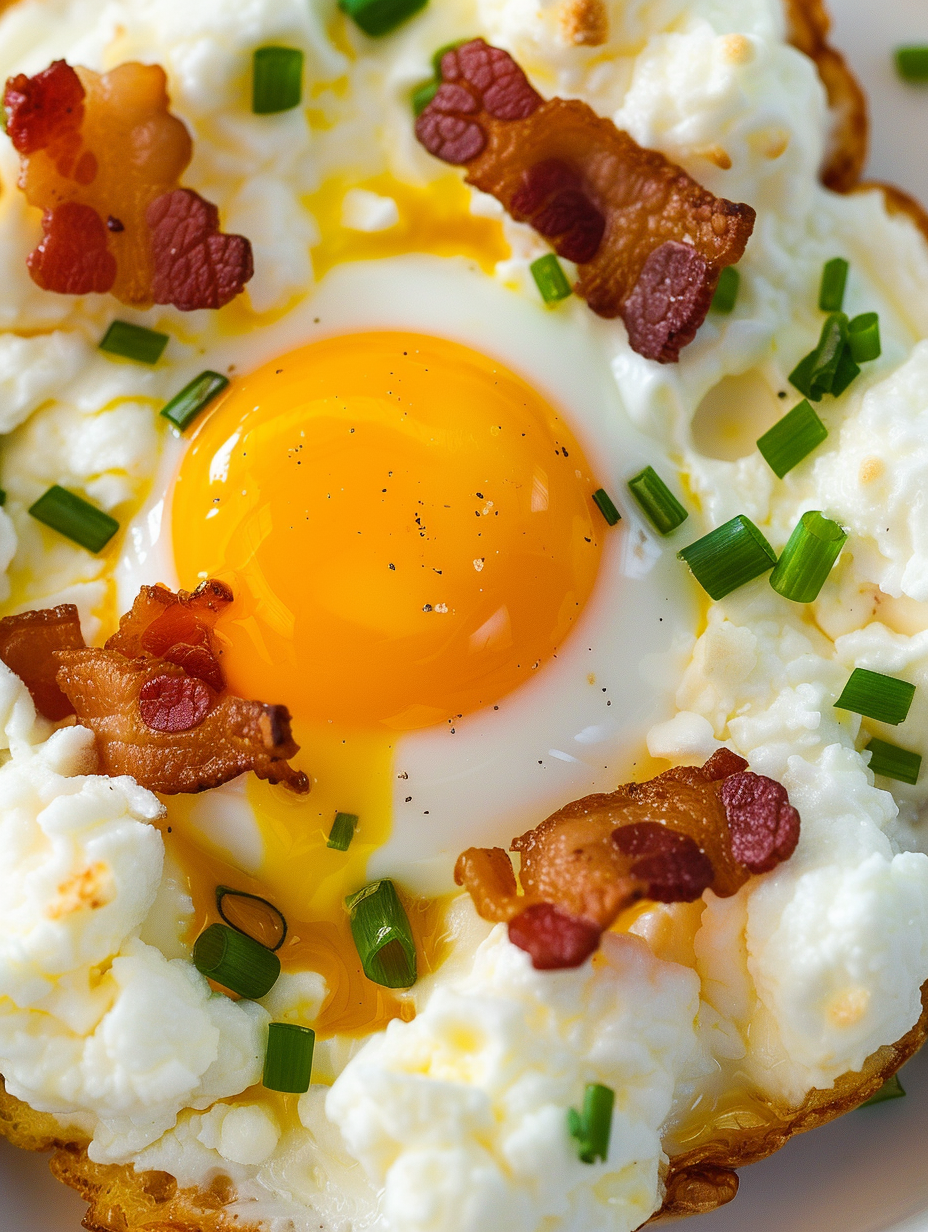
Pillowy whipped egg whites crowned with a runny yolk, crispy bacon, and fresh scallions — a bright, easy breakfast ready in 20 minutes.
Personally, I love how these transform a mundane morning into something playful. My teenager, who normally sleeps through alarms, got out of bed smelling bacon and decided 10 minutes later to join the table. That memory alone makes this little recipe a keeper. We discovered that using Colby Jack gives a gentle milky note that melts without weighing down the foam, and the bacon is the textural key that keeps every bite interesting.
I love how flexible this dish is. One weekend I doubled the batch for friends and everyone commented on how restaurant-quality it looked despite the simple method. The biggest insight is to respect the whites: gentle folding and immediate baking yield the lightest texture. The family still argues about whether to add a dab of truffle oil or to keep it purely bacon and scallions; either way, the clouds always disappear first from the plate.
If you must store components, keep bacon and grated cheese refrigerated in airtight containers for up to three days. Prepared whites without yolks can be refrigerated briefly in a covered container for no more than 24 hours but will lose loft; I do not recommend making the entire dish ahead. For short holding, keep baked whites and yolks separately in the refrigerator for up to 6 hours and rewarm in a low oven at 275°F for 5 minutes. Use glass or metal containers to avoid trapping moisture. Freshly assembled clouds are best enjoyed within 10 minutes of baking for optimal texture and yolk runniness.
Swap Colby Jack for mild cheddar, fontina, or Gruyère for a nuttier profile; use the same 1/2 cup measure. For a vegetarian option without bacon, try sautéed mushrooms or roasted cherry tomatoes to add savory contrast. If you need dairy-free, omit the cheese and add a pinch of nutritional yeast and extra salt for umami, though the foam will be slightly less structured. To reduce sodium, use low-sodium bacon or omit added salt and rely on the cheese and bacon for seasoning.
Serve two clouds per person alongside slices of toasted sourdough or a simple arugula salad dressed with lemon and olive oil. Add buttered asparagus or sautéed spinach for a green element that complements the yolk. For a weekend brunch, arrange clouds on a large wooden board with toasted bread, hummus, and fresh fruit for a balance of textures and flavors. Garnish with microgreens or a sprinkle of smoked paprika to introduce color and a subtle smoky aroma.
Whipped egg dishes have appeared across culinary traditions, from French soufflés to Japanese meringue-style preparations. The modern trend of making eggs in cloud form gained popularity on social media as cooks looked for visually striking yet simple breakfast ideas. This preparation borrows the aeration technique of meringue and applies it to savory eggs, creating an interplay of textures that feels refined but relies on everyday ingredients. The addition of bacon echoes classic American breakfast flavors, while the concept reflects European techniques of incorporating air into egg whites.
In spring, swap scallions for chopped chives and add young peas for a fresh, bright plate. Summer invites grilled corn kernels and fresh basil for sweetness and herbaceous aroma. In autumn, fold in a small amount of grated aged cheddar and a pinch of smoked paprika, and top with roasted shallots for a deeper, savory profile. For winter gatherings, serve clouds alongside roasted squash and a spoonful of maple-browned butter for cozy richness.
Prep bacon and grate the cheese up to three days ahead to shave minutes off morning assembly. Keep egg yolks refrigerated in a covered bowl for up to 24 hours if separated carefully. When planning weekday breakfasts, pre-line pans and portion the cheese in small ramekins so whipping the whites is the only real step to do right before baking. For reheating, place assembled clouds in a 275°F oven for 4 to 6 minutes; yolks will firm slightly, so check often to preserve runniness.
These cloud eggs are proof that small technique changes create elevated results. Whether you keep it simple with bacon and scallions or experiment with cheeses and herbs, the approach rewards a little attention and yields a memorable breakfast. Serve warm, savor the contrast of textures, and make it your own — that is the real joy in this dish.
Make sure bowls and beaters are completely dry and oil-free to achieve maximum volume when whipping whites.
Fold cheese gently into the whipped whites to preserve air and keep the clouds light.
Form the wells for the yolks firmly so the yolks nest and do not run off the cloud during the final bake.
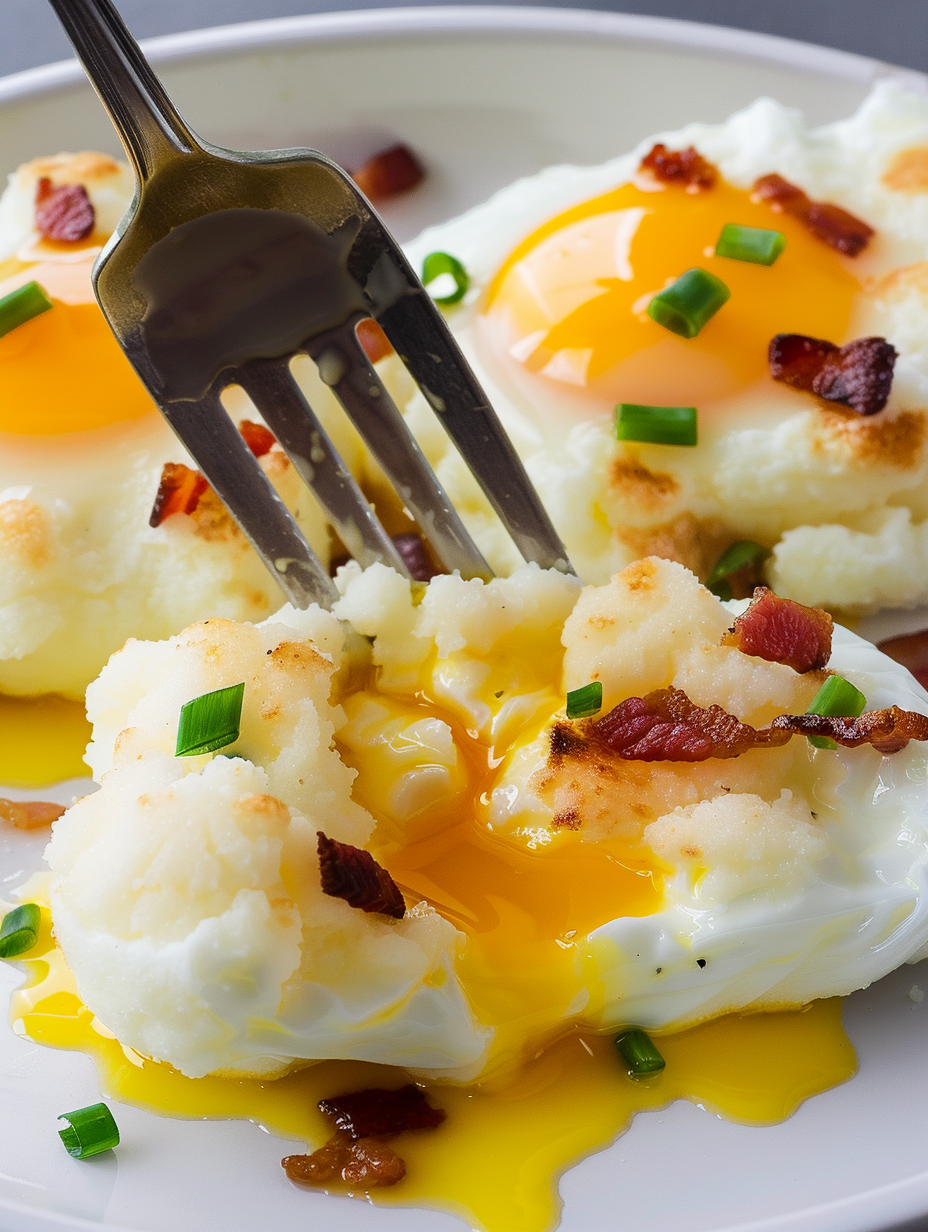
Serve immediately for best texture; reheat briefly at low temperature if necessary.
This nourishing cloud eggs with cheesy bacon and scallions recipe is sure to be a staple in your kitchen. Enjoy every moist, high protein slice — it is perfect for breakfast or as a wholesome snack any time.
Use room-temperature eggs and ensure no yolk contaminates the whites. Clean, dry bowls and beaters help the whites reach stiff peaks faster.
Bake for 4 minutes after adding the yolks for runny yolks. Add 1 to 2 extra minutes for firmer yolks.
This Cloud Eggs with Cheesy Bacon and Scallions recipe makes perfectly juicy, tender, and flavorful steak every time! Serve with potatoes and a side salad for an unforgettable dinner in under 30 minutes.
Preheat oven to 350°F and line a baking sheet with parchment paper. Ensure mixing bowl and beaters are clean and dry.
Crack the eggs and separate whites from yolks, keeping yolks whole in a small bowl. Work carefully to avoid shell pieces in the whites.
Use an electric mixer to beat whites to stiff peaks, about 4 to 5 minutes. Whites should be glossy and hold their shape without sliding.
Gently fold in 1/2 cup shredded Colby Jack and 1/2 teaspoon salt with a spatula, preserving as much air as possible.
Spoon the whites into six even piles on the tray and use the back of a spoon to create shallow wells in each center for the yolks.
Bake the whites for 6 minutes, until set and no longer jiggly. Edges should be beginning to pale gold but still soft on top.
Carefully place one yolk into each well and bake 4 more minutes for runny yolks. Add 1 to 2 minutes for a firmer yolk.
Top with crumbled bacon and chopped scallions. Serve immediately alongside toast or a light salad.
Last Step: Please leave a rating and comment letting us know how you liked this recipe! This helps our business to thrive and continue providing free, high-quality recipes for you.
Leave a comment & rating below or tag
@velvetyum on social media!

Tender grilled zucchini rolled with a basil-kissed ricotta filling, nestled in marinara, and baked until the mozzarella bubbles and turns golden.

Golden, garlicky rounds with a deep-fried crunch made lighter in the air fryer. A fast, vitamin-packed side everyone devours.

Tender chicken meatballs simmered in marinara, finished with melted mozzarella and basil for cozy, weeknight Italian comfort in every bite.
Leave a comment & rating below or tag @velvetyum on social media!
Enjoyed this recipe? Share it with friends and family, and don't forget to leave a review!
This recipe looks amazing! Can't wait to try it.
Comments are stored locally in your browser. Server comments are displayed alongside your local comments.

Join to receive our email series which contains a round-up of some of our quick and easy family favorite recipes.
