
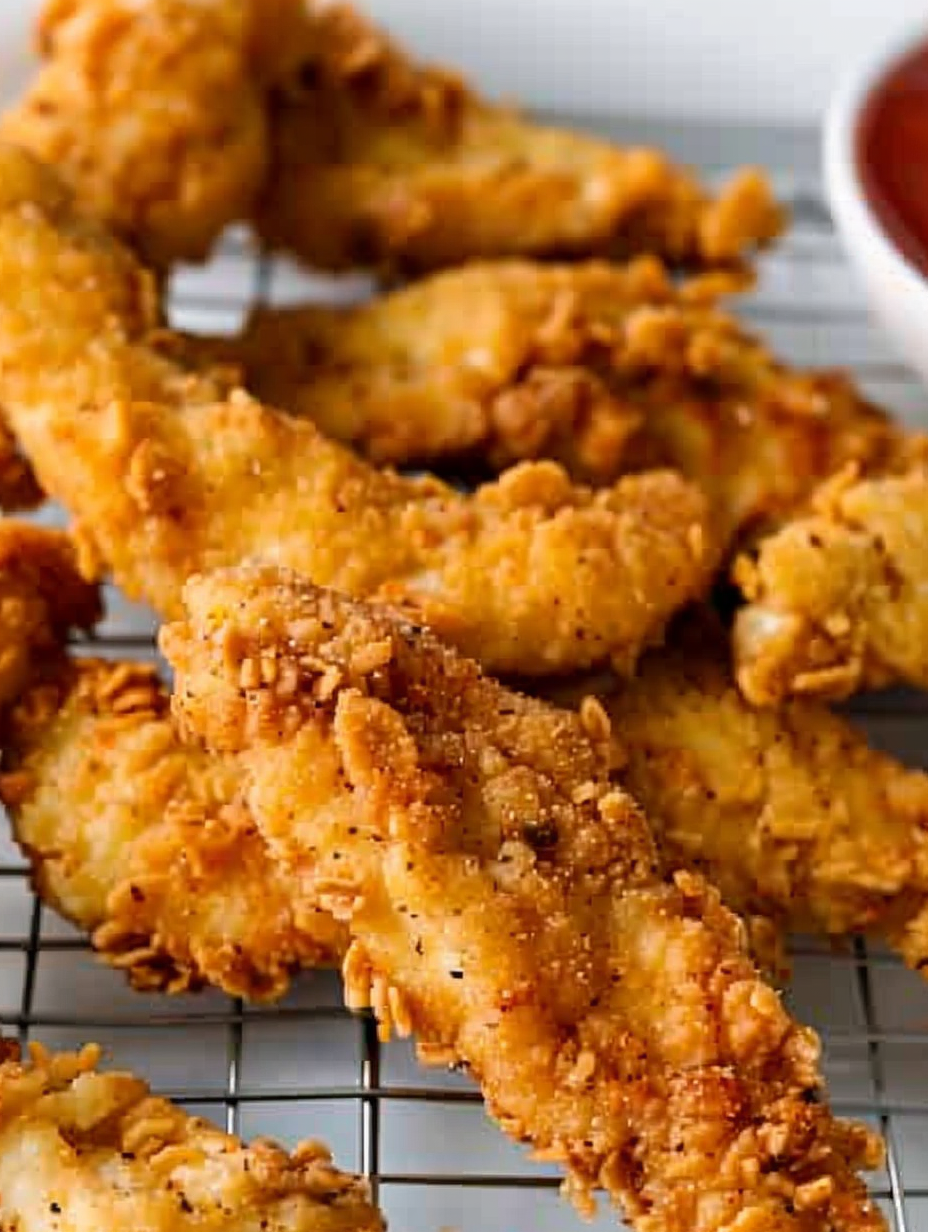
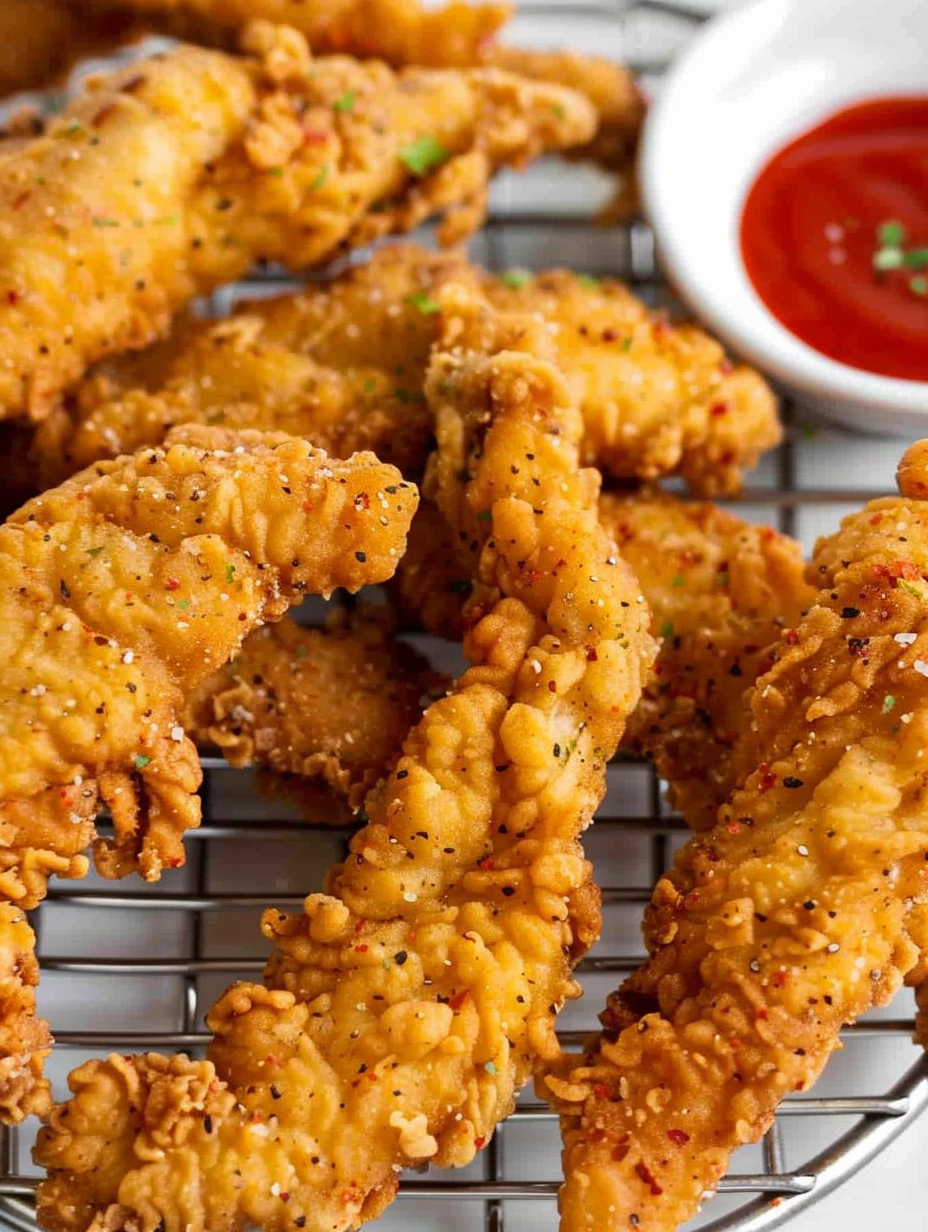
Extra Crispy Fried Chicken Tenders

These EXTRA CRISPY fried chicken tenders deliver restaurant-style crunch at home. Learn chef tricks—dry brine, egg-white batter, and pounding—for a light, crackly crust and juicy interior.
This recipe for extra crispy fried chicken tenders is my go-to when I want something that tastes like it came from a favorite roadside diner but made with care at home. I discovered these techniques one weekend when I had two large chicken breasts and a craving for something crunchy. After experimenting with egg whites instead of whole eggs, dry-brining overnight, and using a light breadcrumb mix, the result was immediate: a shatteringly crisp exterior and a tender, juicy interior that everyone at the table declared perfect. The texture is what keeps me coming back—the batter grips into tiny crevices because I pound the meat lightly, creating a toothsome surface that holds onto the coating.
I often make a double batch for gatherings and have learned a few tricks that transform a simple pantry list into something memorable. The seasoning balance—seasoned salt, a touch of paprika, cayenne for warmth, and a good grind of black pepper—gives the outside a savory lift without overpowering the chicken. These tenders are also forgiving: with a brief dry brine, they stay juicy even when cooked a little longer, which is reassuring when you're frying in batches. Whether you serve them as a snack, part of a main course, or with dipping sauces for kids, they have that craveable crunch that disappears too quickly from the plate.
Why You'll Love This Recipe
- The method yields a restaurant-style crunch using simple pantry ingredients and a single bowl for the breading mix, so cleanup is quick and easy.
- Ready in about 45 minutes from start to finish (15 minutes active prep, 30 minutes frying), perfect for weeknights or casual entertaining.
- Uses egg whites and a breadcrumb-flour blend to achieve a light, shattering crust that stays crisp when held on a wire rack instead of a paper towel.
- Make-ahead friendly: dry brine the seasoned chicken for up to 4 hours in the fridge, or prep the breading and egg whites the day before.
- Crowd-pleasing and versatile — serve with honey mustard, barbecue, or toss in a sauce to transform the dish into a saucier offering like orange-glazed tenders.
- Accessible: the ingredients are common brands and pantry staples you likely already have, while the technique is straightforward for cooks at any level.
My first time serving these was at a backyard movie night; neighbors kept coming back for one more, praising the crunch and the juicy center. Over time I tweaked the seasoning and found that a whisper of cayenne and a generous turn of black pepper gives the coating personality without heat that overwhelms kids or picky eaters.
Ingredients
- Chicken: 2 large boneless, skinless chicken breasts — choose firm, cold-packed breasts for even slicing. Ask your butcher for thicker breasts if you want longer tenders. Cutting to similar sizes ensures even cooking.
- Seasoning: Kosher salt and freshly ground black pepper — coarse salt helps with the dry-brine and flavor penetration; use about 1/4 to 1/2 teaspoon per pound as a guide.
- Egg whites: 3 egg whites — using whites gives a lighter, crispier coating that clings without becoming heavy or eggy.
- Oil for frying: 48 fl oz canola oil — a neutral oil with a high smoke point; make sure there’s enough oil to fill your pot no more than halfway.
- Breading: 1 cup all-purpose flour and 1/3 cup plain or Italian breadcrumbs — the flour creates structure and the breadcrumbs add flake and texture. Use seasoned breadcrumbs for extra flavor, or plain when you want to control seasoning.
- Spices: 1 1/2 teaspoons seasoned salt, 1/2 teaspoon paprika, 1/4 teaspoon cayenne pepper, 1 teaspoon black pepper — choose smoked paprika for a subtle smoky note, or sweet paprika for milder color.
Instructions
Prepare cooling area: Set cooling racks over a baking sheet so excess oil can drip away and air can circulate. This keeps the tenders crisp on all sides—never rest fried chicken on paper towels, which steam and soften the crust. Slice and season: Cut each chicken breast into 3–5 strips about 3/4 inch thick and roughly 5 inches long for uniform tenders. Pat dry with paper towels. Lightly sprinkle salt and pepper on both sides (about 1/4–1/2 teaspoon coarse salt per pound of chicken) to begin flavoring the interior. Optional dry brine: For best texture and juiciness, place the seasoned strips uncovered on a plate in the fridge for up to 4 hours. The surface will dry slightly, which helps the breading adhere and allows salt to penetrate for a more flavorful interior. Bring to room temperature: Remove the chicken from the fridge 20 minutes before frying so the tenders cook evenly from edge to center. Cold meat straight from the refrigerator risks overcooking the exterior while the interior comes to temperature. Mix breading: Combine flour, breadcrumbs, seasoned salt, paprika, cayenne, and black pepper in a shallow bowl. Whisk to distribute spices evenly—this mix is what creates the golden color and crunch. Beat egg whites: Crack and separate 3 egg whites into a bowl. Beat just until frothy and slightly peaked; you want some air for lift but not a dense meringue. The whites act like a glue that dries into a crisp shell instead of a heavy custard. Create surface texture: Cover each strip with plastic wrap and use the rough side of a meat mallet to lightly pound the meat. You’re not flattening the tender—just creating micro-texture so the breading can grip into nooks and stay put during frying. Bread the tenders: Dip each strip into the beaten egg whites, shaking off excess, then press into the breading mix until every ridge is coated. Use your hands to press crumbs into crevices to ensure a complete crust. Heat the oil: Fill a dutch oven or deep fryer with oil no more than halfway (about 48 fl oz in a large pot). Heat to 350–375°F. Use a candy or deep-fry thermometer for accuracy—temperature control prevents greasy results or burned crust. Fry in batches: Fry tenders in small batches so the oil temperature recovers quickly. Each side will take about 4 minutes to reach a deep golden brown—turn once with tongs. Avoid overcrowding the pot; crowded oil drops in temperature and yields soggy coating. Drain and hold: Transfer cooked tenders to the wire racks. Keep finished batches in a 200°F oven on the racks to maintain warmth and crispness while you finish frying. Confirm the internal temperature reaches 165°F before serving.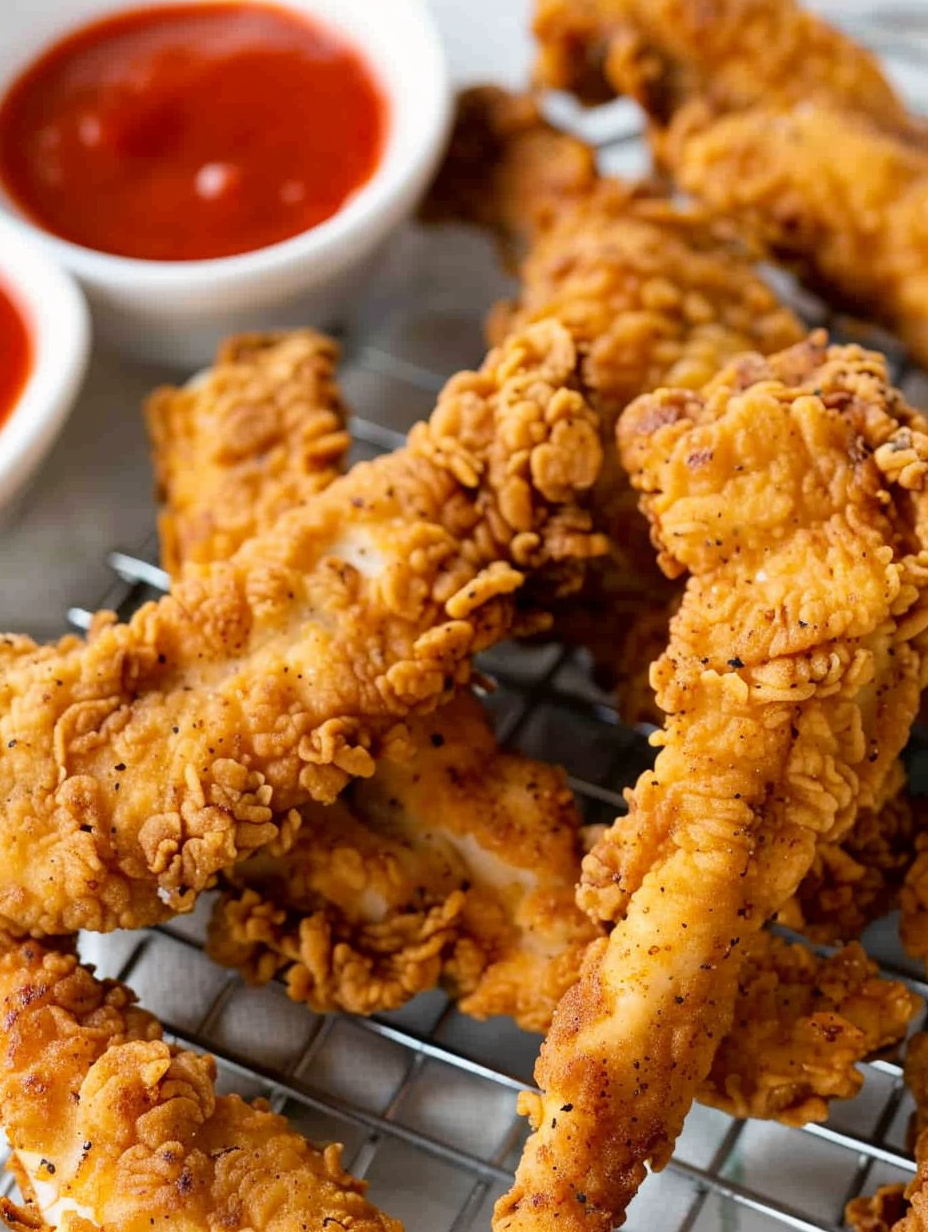
You Must Know
- These tenders freeze well for up to 3 months; cool completely, then freeze on a tray before transferring to an airtight bag to prevent sticking.
- High-protein and moderate-calorie option—each tender averages about 126 kcal as noted; the frying technique manages oil absorption by maintaining proper temperature.
- Store leftovers in the fridge for up to 3 days; reheat in a 375°F oven on a rack to restore crispness rather than microwaving, which will soften the coating.
- Canola oil is chosen for its neutral taste and high smoke point; you may substitute peanut or vegetable oil if preferred and allergy-safe.
What I love most is how dependable this approach is. After dozens of batches, I still follow the same sequence: dry brine when possible, pound lightly, dip in whites, and fry at a steady 350–375°F. Family and friends notice the texture—the crust breaks in a satisfying manner and the inside stays moist. This method has saved many potlucks and casual dinners by delivering consistent results without complicated steps.
Storage Tips
For short-term storage, place tenders on a wire rack uncovered in the fridge for up to 24 hours if you want to keep the crust crisp; otherwise, store in an airtight container for up to 3 days. To freeze, lay cooked tenders on a baking sheet in a single layer until solid, then transfer to freezer bags with as much air removed as possible. Reheat from frozen in a preheated oven at 375°F for 12–15 minutes, flipping halfway through, or until internal temperature reaches 165°F. Avoid microwaving to preserve the crunchy texture.
Ingredient Substitutions
If you need gluten-free options, substitute 1 cup gluten-free all-purpose flour and gluten-free breadcrumbs—note the texture will be slightly different but still crunchy. Swap canola oil with peanut or sunflower oil depending on flavor preference and allergy considerations. For a lighter coating, use panko breadcrumbs instead of regular breadcrumbs for larger, flakier crumbs. Omit cayenne for kids or increase it by an additional 1/4 teaspoon for a spicier kick.
Serving Suggestions
Serve with classic honey mustard, ranch, or a smoky barbecue sauce. For a Southern-style plate, pair with coleslaw, mashed potatoes, and pickles. For a fun party platter, slice tenders into bite-size pieces and arrange with assorted dipping sauces—sweet chili, buffalo, and honey garlic work beautifully. Garnish with chopped parsley or thin lemon wedges for brightness. These tenders also make great sandwich fillings with slaw and pickles on a soft brioche bun.
Cultural Background
Fried chicken tenders are a modern spin on fried chicken traditions found across the United States, blending Southern frying techniques with a handheld, snackable format. Breadcrumb coatings and lighter batters are influenced by both American diner culture and global frying practices—panko from Japan, for example, adds a distinctive flake. The approach here marries classic Southern crisp with diner-style convenience and modern tweaks like egg whites for texture.
Seasonal Adaptations
In spring and summer, serve tenders alongside a bright herb salad or cucumber dill slaw and swap paprika for smoked paprika to complement outdoor grilling flavors. In cooler months, offer rich sides like roasted root vegetables and a warm gravy or gravy-style sauce for dipping. Holiday gatherings benefit from an upscale presentation—slice tenders and place atop mini cornbread rounds with a drizzle of maple mustard.
Meal Prep Tips
Make the breading mix and beat the egg whites the night before, and portion chicken into zip-top bags for quick assembly. Fry half the batch and freeze the remainder; reheat from frozen in the oven to maintain crispness. For packed lunches, cool tenders completely and place in an insulated container with a cold dipping sauce on the side. Label containers with the date and reheat within 3 days for best quality.
These extra crispy tenders are simple, comforting, and endlessly adaptable. I encourage you to try the dry-brine and egg-white trick—once you experience how the crust behaves, you’ll understand why it stays a favorite in my kitchen. Share them, tweak the spices, and make this version your own.
Pro Tips
Dry-brine the seasoned strips for up to 4 hours to help the breading adhere and to deepen flavor.
Pound the meat lightly under plastic wrap to create micro-texture that helps the coating stick and crisps better.
Maintain oil temperature between 350–375°F so the crust browns quickly without overcooking the interior.
Rest fried tenders on a wire rack instead of paper towels to prevent steam-softening the crust.
This nourishing extra crispy fried chicken tenders recipe is sure to be a staple in your kitchen. Enjoy every moist, high protein slice — it is perfect for breakfast or as a wholesome snack any time.
FAQs about Recipes
Can I air fry these instead of deep frying?
Yes—if you prefer, you can air fry at 375°F for a total of about 9–10 minutes, flipping once and spraying the breading with oil. Results will be drier and less rich than deep frying.
How do I keep the coating from getting greasy?
Use a candy/deep-fry thermometer and ensure oil stays between 350–375°F. If oil drops too low, the crust will absorb more oil and become greasy.
How long do leftovers last?
Cool tenders on a wire rack and keep them in a single layer in the refrigerator for up to 3 days. Reheat in a hot oven to bring back crispness.
Tags
Extra Crispy Fried Chicken Tenders
This Extra Crispy Fried Chicken Tenders recipe makes perfectly juicy, tender, and flavorful steak every time! Serve with potatoes and a side salad for an unforgettable dinner in under 30 minutes.
Ingredients
Chicken
Wet
Breading
Frying
Instructions
Set up cooling area
Arrange wire cooling racks over a rimmed baking sheet to catch oil drips and allow air circulation on all sides of the cooked tenders.
Slice and season the chicken
Cut breasts into 3–5 equal strips about 3/4 inch thick. Pat dry and season lightly with kosher salt and black pepper on both sides.
Optional dry brine
Place seasoned strips uncovered in the refrigerator for up to 4 hours to dry the surface and allow salt to penetrate for juicier meat and better breading adhesion.
Prepare breading and egg whites
Combine flour, breadcrumbs, seasoned salt, paprika, cayenne, and black pepper in a shallow dish. Beat 3 egg whites until frothy in a separate bowl.
Pound for texture
Cover strips with plastic wrap and lightly pound with the rough side of a meat mallet to create surface texture so the coating clings.
Bread each tender
Dip strips into egg whites, shake off excess, then press into the breading mix, ensuring all nooks and edges are coated firmly.
Heat oil to 350–375°F
Fill a dutch oven no more than halfway with canola oil and heat to 350–375°F, using a deep-fry thermometer to monitor temperature accurately.
Fry in batches
Fry tenders in small batches, about 3–4 minutes per side, until golden brown. Avoid overcrowding so oil temperature recovers between batches.
Drain and hold
Place fried tenders on the prepared racks. Keep finished batches in a 200°F oven to stay warm and crisp. Confirm internal temperature of 165°F before serving.
Last Step: Please leave a rating and comment letting us know how you liked this recipe! This helps our business to thrive and continue providing free, high-quality recipes for you.
Nutrition
Did You Make This?
Leave a comment & rating below or tag
@velvetyum on social media!
Categories:
You might also like...

Cheesy Zucchini Rollatini
Tender grilled zucchini rolled with a basil-kissed ricotta filling, nestled in marinara, and baked until the mozzarella bubbles and turns golden.

Crispy Zucchini and Squash
Golden, garlicky rounds with a deep-fried crunch made lighter in the air fryer. A fast, vitamin-packed side everyone devours.

Chicken Parmesan Meatballs
Tender chicken meatballs simmered in marinara, finished with melted mozzarella and basil for cozy, weeknight Italian comfort in every bite.
Did You Make This?
Leave a comment & rating below or tag @velvetyum on social media!
Rate This Recipe
Share This Recipe
Enjoyed this recipe? Share it with friends and family, and don't forget to leave a review!
Comments (1)
This recipe looks amazing! Can't wait to try it.
Comments are stored locally in your browser. Server comments are displayed alongside your local comments.

Hi, I'm Emma!
What's Popular

30-Minute Meals!
Join to receive our email series which contains a round-up of some of our quick and easy family favorite recipes.