
No Bake Apple Pie Cheesecake In A Jar

A quick, no-bake apple pie cheesecake layered in mason jars — perfect for portion control, make-ahead treats, and gifts. Ready in 15 minutes and irresistibly creamy.
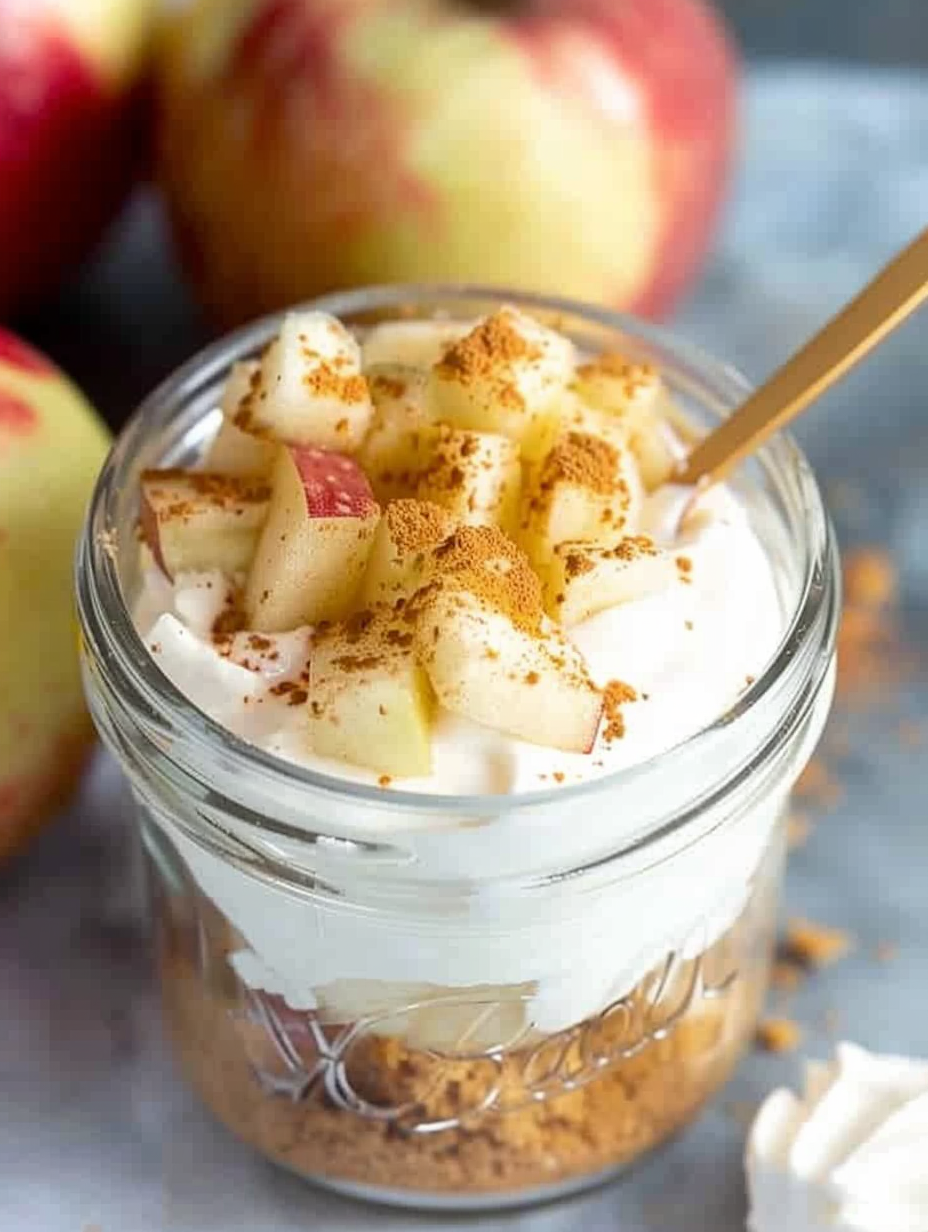
This dessert is my favorite quick-fix for unexpected guests and a comfort-food treat I discovered during a busy fall weekend when I wanted the warmth of apple pie without turning on the oven. I started by caramelizing a couple of apples in a skillet and mixing a silky, tangy filling with cream cheese and thick Greek yogurt. The flavor hit the sweet spot: bright apple notes, warm apple-pie spice, and a lush, creamy filling that tastes indulgent but comes together in minutes. Serving these in small mason jars made them portable, perfectly portioned, and charming for gatherings.
I remember one Saturday morning when a last-minute brunch invitation meant I needed a dessert I could prepare quickly and transport easily. I cooked the apples while I whipped up the filling, layered everything into four jars, and chilled them while I got dressed. Guests loved the presentation; several asked for the recipe before dessert plates were cleared. The jars deliver a satisfying crunch from graham crumbs, a creamy middle, and bright sautéed apples on top — the texture contrast is the heart of this treat.
Why You'll Love This Recipe
- Ready in about 15 minutes from start to finish, meaning you can make these between errands or while dinner cooks.
- Uses simple pantry staples and a couple of fresh apples — no special baking equipment required.
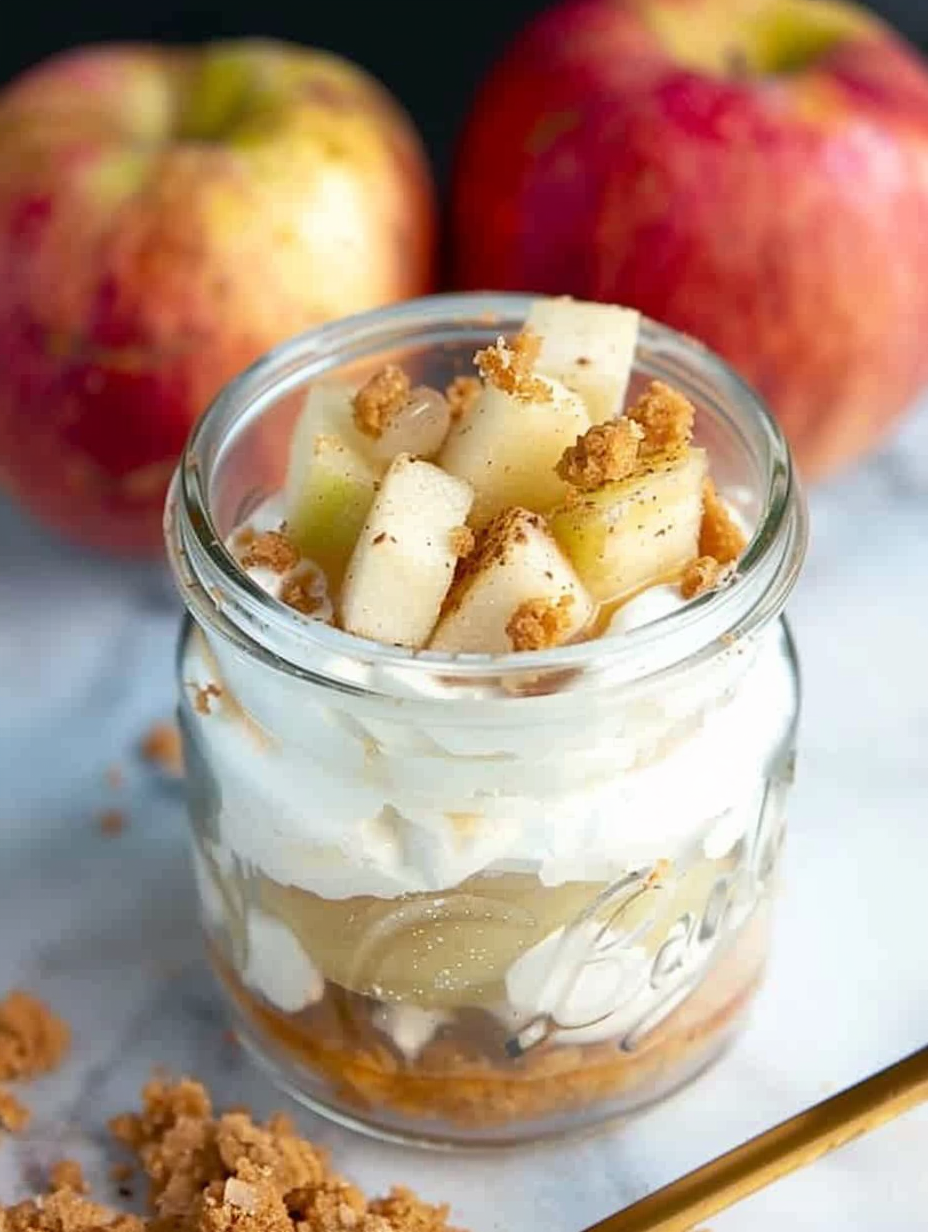
- Served in mason jars for easy portion control, transport, and gift-giving; jars keep layers intact and look beautiful on the table.
- No oven or complicated tempering; the filling is whipped cold and sets in the fridge, making it ideal for warm days or tiny kitchens.
- Make-ahead friendly: assemble and refrigerate up to 7 days, or freeze components separately for longer storage.
- Customizable for dietary needs: swap coconut oil for butter, use gluten-free crumbs, or substitute a vegan cream cheese for a dairy-free option.
In my experience, these jars travel well and are a hit at potlucks. Family members appreciate the controlled portions, and it’s always rewarding to see the glasses cleared. Making multiple jars at once is quick — the stovetop apples take five minutes and the filling comes together in under five more.
Ingredients
- Apples: Use 2 small apples — firm varieties like Honeycrisp or Granny Smith work well. They hold their shape when sautéed and bring a balance of sweetness and tartness; peel and core them before chopping.
- Coconut oil or butter: 1/2 tablespoon adds a light caramelized flavor to the apples. I prefer coconut oil for a subtle scent, but unsalted butter gives richer caramel notes.
- Brown sugar: 2 tablespoons help the apples caramelize quickly; use light brown for a milder molasses flavor or dark brown for more depth.
- Apple pie spice or cinnamon: 1/2 teaspoon for the apples and 1/2 tablespoon for the filling — this warms the profile with cinnamon, nutmeg, and a hint of clove.
- Cream cheese: 8 ounces, softened to room temperature for a silky filling. Full-fat yields the creamiest texture.
- Greek yogurt: 2/3 cup thick Greek yogurt such as Fage adds tang and lightness; it also stabilizes the filling without gelatin.
- Agave nectar: 6 tablespoons to sweeten the filling while keeping it glossy and smooth; honey or maple syrup can be substituted.
- Vanilla extract: 1 tablespoon to brighten the filling and round the flavors.
- Graham cracker crumbs: 2/3 cup for the crunchy base and middle layer — pulse whole crackers to a fine crumb and toss with a touch of melted butter if you prefer a firmer crust.
Instructions
Make the spiced apples: Peel, core, and chop 2 small apples into 1/4- to 1/2-inch pieces so they soften quickly and hold some texture. Heat a small saucepan over medium heat and add 1/2 tablespoon coconut oil or butter. Add the apples, 2 tablespoons brown sugar, and 1/2 teaspoon apple pie spice or cinnamon. Cook, stirring occasionally, for about 4 to 5 minutes until the apples are tender and lightly caramelized. Watch carefully so the sugar doesn’t burn; if the pan dries, add a splash of water. Transfer to a bowl to cool slightly. Prepare the filling: Place 8 ounces softened cream cheese in a mixing bowl and beat with an electric mixer until smooth and lump-free, about 1 to 2 minutes. Add 6 tablespoons agave nectar, 2/3 cup thick Greek yogurt, 1 tablespoon vanilla extract, and 1/2 tablespoon apple pie spice. Beat until fully combined and fluffy, scraping down the sides of the bowl. The mixture should be creamy and spoonable, not runny; chilling briefly will help if it seems loose. Assemble the jars: Divide 2/3 cup graham cracker crumbs among four small mason jars, placing roughly 2 tablespoons in the bottom of each. Spoon 2 to 3 tablespoons of the filling over the crumbs, then add 2 tablespoons of the warm apple mixture. Add another 2 to 3 tablespoons of filling, then 2 tablespoons graham crumbs, 2 tablespoons filling, and finish with 2 tablespoons apples on top. Press each layer gently with the back of a spoon to compact. Chill for at least 30 minutes to let flavors marry, or serve immediately for a softer set. Serve and store: Serve chilled, optionally topped with a small dollop of Greek yogurt or a sprinkle of extra apple pie spice. Cover with lids and refrigerate up to 7 days, or freeze without the apples for longer storage and add fresh apples before serving.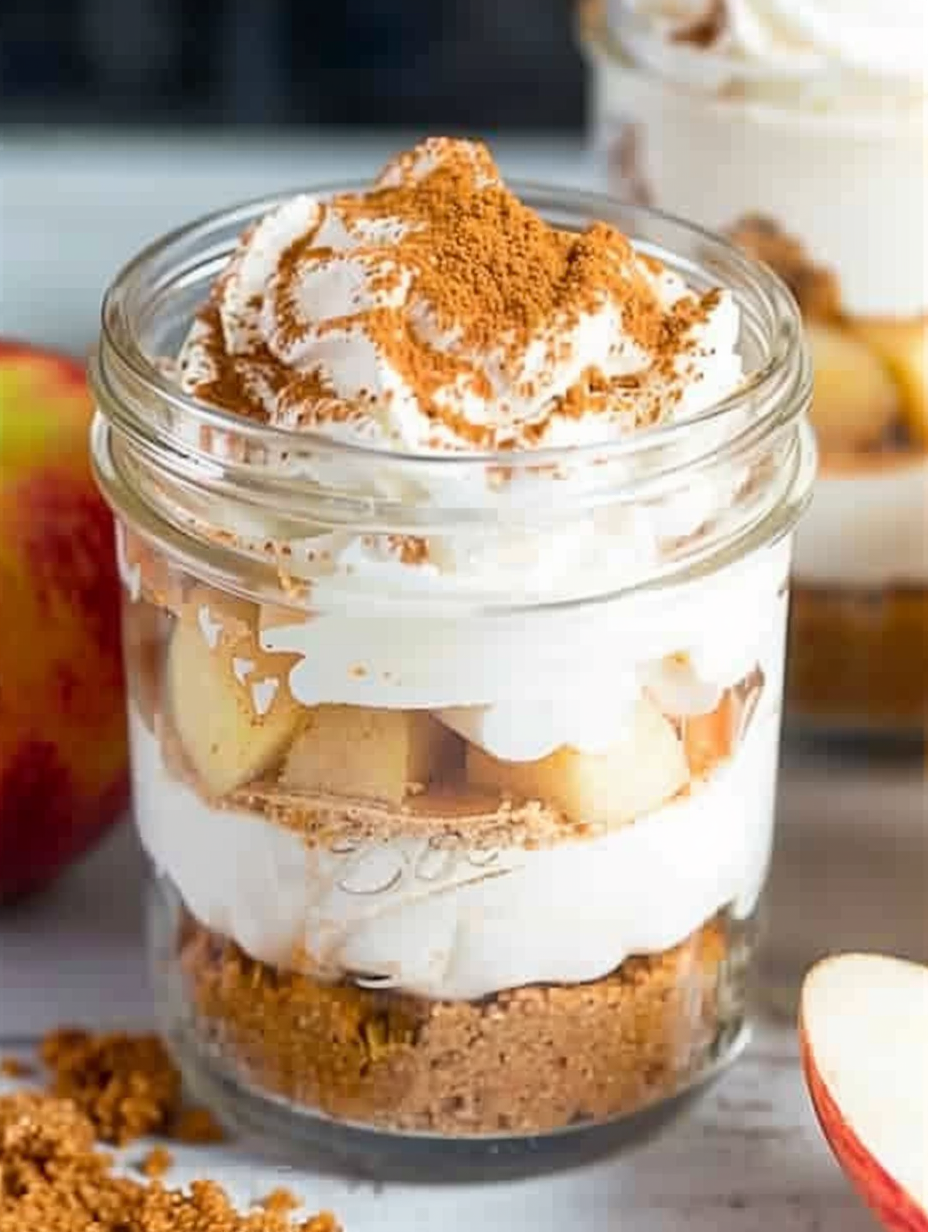
You Must Know
- High in flavor and moderate in calories: each jar is about 467 kcal, so they are best enjoyed as a special treat or shared.
- Store covered in the refrigerator for up to 7 days; the graham crumbs will soften over time but layers remain delicious.
- Freeze filling or crumbs separately for up to 3 months; thaw overnight in the refrigerator before assembling.
- Contains dairy and gluten; use dairy-free cream cheese and gluten-free crumbs to adapt for allergies.
- Small mason jars are ideal — use 8-ounce jars for neat layering and easy serving.
I love how portable these jars are for picnics or potlucks. One memorable summer picnic involved handing these out as a surprise dessert; they were gone in minutes and folks appreciated the tiny, elegant portions. Layering the components also allows guests to see the dessert process and appreciate the texture contrast.
Storage Tips
Store completed jars in the refrigerator with tight-fitting lids for up to 7 days. Over time the graham crumbs will absorb moisture and soften, so if you prefer a crunch, store crumbs separately in an airtight container and add before serving. For freezing, remove the apple topping and freeze the filling in a sealed container for up to 3 months; thaw in the refrigerator overnight and reheat apples briefly before assembling. Use glass jars that are freezer-safe if you plan to freeze assembled portions, and label containers with the date for best quality.
Ingredient Substitutions
Swap agave nectar for honey or maple syrup in equal amounts for a slightly different sweetness profile. Replace Greek yogurt with sour cream for richer tang, or use a vegan cream cheese and coconut yogurt to make this dairy-free. For a gluten-free option, substitute gluten-free graham crumbs or finely crushed gluten-free cookies. If you prefer less sugar, reduce the agave to 4 tablespoons and increase vanilla and spice to keep flavor intensity. For a nuttier crust, mix 1/4 cup finely chopped pecans into the graham crumbs.
Serving Suggestions
Serve these jars cold as individual desserts at parties, or present them on a dessert board with sliced apples and extra graham crumbs. A small sprig of fresh mint or a dusting of extra apple pie spice on top makes them look festive. Pair with strong coffee or lightly spiced tea. For brunch, serve alongside cinnamon French toast or pancakes to echo the autumnal flavors.
Cultural Background
This treat blends American favorites — apple pie and cream cheese fillings — into a portable format inspired by the recent trend of layered desserts in jars. Apple pie is deeply rooted in American home cooking, while no-bake chilled fillings have long been used for convenience and texture contrast. Combining them honors old-school flavors with modern presentation and minimal fuss.
Seasonal Adaptations
In autumn, use Honeycrisp or Braeburn apples and increase spice to 3/4 tablespoon for a warmer profile. In summer, swap the apples for lightly macerated berries with a splash of lemon for a bright variation. For holiday gatherings, fold a tablespoon of pumpkin puree into the filling and add ginger to the spices for a seasonal mash-up.
Meal Prep Tips
Make the apple topping and filling up to three days ahead; store separately in airtight containers. Keep graham crumbs in a dry container until ready to assemble. When assembling multiple jars, use piping bags to fill layers neatly and save time. Label jars with use-by dates and stack them carefully in the refrigerator to prevent tipping.
These jars are a small, joyful dessert that combine nostalgia and convenience. Whether you’re feeding a crowd or treating yourself, they’re forgiving, delicious, and endlessly adaptable — make them your own and enjoy the smiles they bring.
Pro Tips
Soften cream cheese to room temperature for a lump-free, silky filling.
Chop apples into uniform small pieces so they cook evenly in 4-5 minutes.
Use a piping bag to layer the filling neatly and speed up assembly.
This nourishing no bake apple pie cheesecake in a jar recipe is sure to be a staple in your kitchen. Enjoy every moist, high protein slice — it is perfect for breakfast or as a wholesome snack any time.
FAQs about Recipes
How long will these last in the fridge?
Yes — assemble the jars and refrigerate up to 7 days. For best texture, store crumbs separately and add just before serving if you want crunch.
Can I freeze these?
Freeze the filling or crumbs separately for up to 3 months. Thaw in the refrigerator overnight before assembling with fresh apples.
Tags
No Bake Apple Pie Cheesecake In A Jar
This No Bake Apple Pie Cheesecake In A Jar recipe makes perfectly juicy, tender, and flavorful steak every time! Serve with potatoes and a side salad for an unforgettable dinner in under 30 minutes.
Ingredients
For the apples
For the filling
Other
Instructions
Cook the apples
Peel, core, and chop apples into small pieces. Heat coconut oil or butter in a small saucepan over medium heat. Add apples, brown sugar, and apple pie spice. Cook for 4 to 5 minutes until softened and lightly caramelized; transfer to a bowl to cool.
Make the filling
Beat softened cream cheese until smooth. Add agave nectar, Greek yogurt, vanilla extract, and apple pie spice. Beat until creamy and well combined, scraping the bowl as needed.
Assemble jars
Divide graham crumbs among four jars (about 2 tablespoons each). Layer with filling and apples as follows: crumbs, 2-3 tablespoons filling, 2 tablespoons apples, 2-3 tablespoons filling, 2 tablespoons crumbs, 2 tablespoons filling, finish with 2 tablespoons apples. Press gently and chill or serve immediately.
Serve and store
Serve chilled, optionally topped with extra spice or a dollop of yogurt. Cover and refrigerate up to 7 days; freeze filling separately up to 3 months.
Last Step: Please leave a rating and comment letting us know how you liked this recipe! This helps our business to thrive and continue providing free, high-quality recipes for you.
Nutrition
Did You Make This?
Leave a comment & rating below or tag
@velvetyum on social media!
Categories:
You might also like...

Cheesy Zucchini Rollatini
Tender grilled zucchini rolled with a basil-kissed ricotta filling, nestled in marinara, and baked until the mozzarella bubbles and turns golden.

Crispy Zucchini and Squash
Golden, garlicky rounds with a deep-fried crunch made lighter in the air fryer. A fast, vitamin-packed side everyone devours.

Chicken Parmesan Meatballs
Tender chicken meatballs simmered in marinara, finished with melted mozzarella and basil for cozy, weeknight Italian comfort in every bite.
Did You Make This?
Leave a comment & rating below or tag @velvetyum on social media!
Rate This Recipe
Share This Recipe
Enjoyed this recipe? Share it with friends and family, and don't forget to leave a review!
Comments (1)
This recipe looks amazing! Can't wait to try it.
Comments are stored locally in your browser. Server comments are displayed alongside your local comments.

Hi, I'm Emma!
What's Popular

30-Minute Meals!
Join to receive our email series which contains a round-up of some of our quick and easy family favorite recipes.